前路漫漫 唯风作伴

脚踏大地 仰望星空


  • 首页

  • 归档

  • 标签

react fiber(译)

发表于 2018-10-23 |

这是一篇讲react Fiber算法的文章,深入浅出,并且作者自己实现了Fiber的核心代码,可以很好的帮助我们理解fiber
原文链接

另外,建议读这篇文章之前先看一下他的另外几篇关于react的文章,本篇是建立在其之上的
DIY React

Didact Fiber: Incremental reconciliation

github repository
updated demo

Why Fiber

本文并不会展示一个完整的React Fiber,如果你想了解更多,更多资料

当浏览器的主线程长时间忙于运行一些事情时,关键任务的执行可以能被推迟。

为了展示这个问题,我做了一个demo,为了使星球一直转动,主线程需要每16ms被调用一次,因为animation是跑在主线程上的。如果主线程被其他事情占用,假如占用了200ms,你会发现animation会发生卡顿,星球停止运行,直到主线程空闲出来运行animation。

到底是什么导致主线程如此繁忙导致不能空闲出几微秒去保持动画流畅和响应及时呢?

还记得以前实现的reconciliation code吗?一旦开始,就无法停止。如果此时主线程需要做些别的事情,那就只能等待。并且因为使用了许多递归,导致很难暂停。这就是为什么我们重写代码,用循环代替递归。

Scheduling micro-tasks

我们需要把任务分成一个个子任务,在很短的时间里运行结束掉。可以让主线程先去做优先级更高的任务,然后再回来做优先级低的任务。

我们将会需要requestIdleCallback()函数的帮助。它在浏览器空闲时才执行callback函数,回调函数中deadline参数会告诉你还有多少空闲时间来运行代码,如果剩余时间不够,那么你可以选择不执行代码,保持了主线程不会被一直占用。

1
2
3
4
5
6
7
8
9
10
11
12
13
14
15
16
17
18
19
20
21
22
23
const ENOUGH_TIME = 1; // milliseconds

let workQueue = [];
let nextUnitOfWork = null;

function schedule(task) {
workQueue.push(task);
requestIdleCallback(performWork);
}

function performWork(deadline) {
if (!nextUnitOfWork) {
nextUnitOfWork = workQueue.shift();
}

while (nextUnitOfWork && deadline.timeRemaining() > ENOUGH_TIME) {
nextUnitOfWork = performUnitOfWork(nextUnitOfWork);
}

if (nextUnitOfWork || workQueue.length > 0) {
requestIdleCallback(performWork);
}
}

真正起作用的函数是performUnitOfWork。我们将会在其中写reconciliation code。函数运行一次占用很少的时间,并且返回下一次任务的信息。

为了组织这些子任务,我们将会使用fibers

The fiber data structure

我们将会为每一个需要渲染的组件创建一个fiber。nextUnitOfWork是对将要运行的下一个fiber的引用。performUnitOfWork会对fiber进行diff,然后返回下一个fiber。这个将会在后面详细解释。

fiber是啥样子的呢?

1
2
3
4
5
6
7
8
9
10
11
12
13
let fiber = {
tag: HOST_COMPONENT,
type: "div",
parent: parentFiber,
child: childFiber,
sibling: null,
alternate: currentFiber,
stateNode: document.createElement("div"),
props: { children: [], className: "foo"},
partialState: null,
effectTag: PLACEMENT,
effects: []
};

是一个对象啊,我们将会使用parent,child,sibling属性去构建fiber树来表示组件的结构树。

stateNode是对组件实例的引用。他可能是DOM元素或者用户定义的类组件实例

举个例子:
fiber_tree

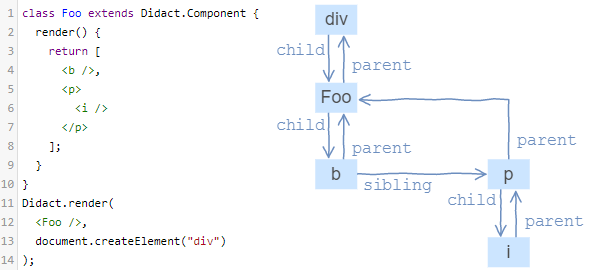
在上面例子中我们可以看到将支持三种不同的组件:

  • b, p, i 代表着host component。我们将会用tag:HOST_COMPONENT来定义他。type属性将会是字符串。props是dom属性和事件。
  • Foo class component。它的tag:CLASS_COMPONENT, type指向用户定义的类组件
  • div代表着 host root。他类似于host component,stateNode也是DOM element.tag: HOST_ROOT.注意stateNode就是传递给render函数的参数。

另外一个重要属性就是alternate,我们需要它是因为大多数时间我们将会有两个fiber tree。一个代表着已经渲染的dom, 我们成其为current tree 或者 old tree。另外一个是在更新(当调用setState或者render)时创建的,称其为work-in-progress tree。

work-in-progress tree不会与old tree共享任何fiber。一旦我们完成work-in-progress tree的构建和dom的改变,work-in-progress tree就变成了old tree。

所以我们使用alternate属性去链接old tree。fiber与其alternate有相同的tag,type,statenode。有时我们渲染新的组件,它可能没有alternate属性

然后,还有一个effects 列表和effectTag。当我们发现work-in-progress需要改变的DOM时,就将effectTag设置为PLACEMENT, UPDATE, DELETION。为了更容易知道总共有哪些需要fiber需要改变DOM,我们把所有的fiber放在effects列表里。

可能这里讲了许多概念的东西,不要担心,我们将会用行动来展示fiber。

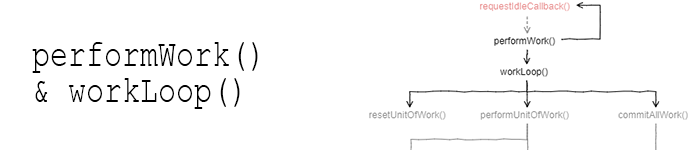
Didact call hierarchy

为了对程序有整体的理解,我们先看一下结构示意图
fiber_call_hierarchy

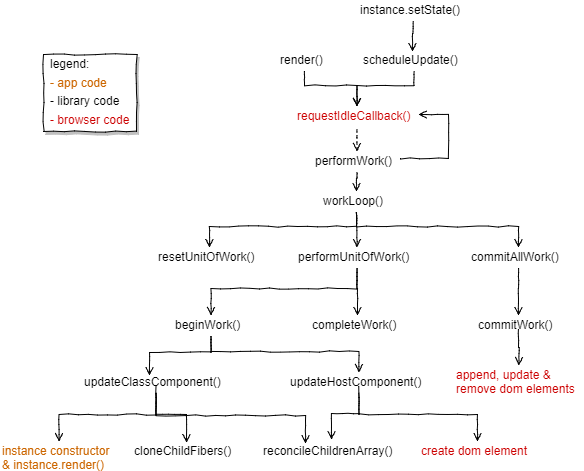
我们将会从render()和setState()开始,在commitAllWork()结束

Old code

我之前告诉你我们将重构大部分代码,但在这之前,我们先回顾一下不需要重构的代码

这里我就不一一翻译了,这些代码都是在文章开头我提到的

  • Element creation and JSX
  • Instances, reconciliation and virtual DOM
  • Components and state,这里的 Class Component需要稍微改动一下
    1
    2
    3
    4
    5
    6
    7
    8
    9
    10
    11
    12
    13
    14
    15
    16
    class Component {
    constructor(props) {
    this.props = props || {};
    this.state = this.state || {};
    }

    setState(partialState) {
    scheduleUpdate(this, partialState);
    }
    }

    function createInstance(fiber) {
    const instance = new fiber.type(fiber.props);
    instance.__fiber = fiber;
    return instance;
    }

render() & scheduleUpdate()

render & scheduleUpdate
除了Component, createElement, 我们将会有两个公共函数render(), setState(),我们已经看到setState() 仅仅调用了scheduleUpdate()。

render() 和 scheduleUpdate()非常类似,他们接收新的更新并且进入队列。

1
2
3
4
5
6
7
8
9
10
11
12
13
14
15
16
17
18
19
20
21
22
23
24
25
26
27
/ Fiber tags
const HOST_COMPONENT = "host";
const CLASS_COMPONENT = "class";
const HOST_ROOT = "root";

// Global state
const updateQueue = [];
let nextUnitOfWork = null;
let pendingCommit = null;

function render(elements, containerDom) {
updateQueue.push({
from: HOST_ROOT,
dom: containerDom,
newProps: { children: elements }
});
requestIdleCallback(performWork);
}

function scheduleUpdate(instance, partialState) {
updateQueue.push({
from: CLASS_COMPONENT,
instance: instance,
partialState: partialState
});
requestIdleCallback(performWork);
}

我们将会使用updateQueue数组来存储等待的更新。每一次调用render 或者 scheduleUpdate 都会将数据存储进updateQueue。数组里每一个数据都不一样,我们将会在resetNextUnitOfWork()函数中使用。

在将数据push存储进队列之后,我们将会异步调用performWork()。

performWork() && workLoop()

fiber_performWork_workLoop

1
2
3
4
5
6
7
8
9
10
11
12
13
14
15
16
17
18
19
20
const ENOUGH_TIME = 1; // milliseconds

function performWork(deadline) {
workLoop(deadline);
if (nextUnitOfWork || updateQueue.length > 0) {
requestIdleCallback(performWork);
}
}

function workLoop(deadline) {
if (!nextUnitOfWork) {
resetNextUnitOfWork();
}
while (nextUnitOfWork && deadline.timeRemaining() > ENOUGH_TIME) {
nextUnitOfWork = performUnitOfWork(nextUnitOfWork);
}
if (pendingCommit) {
commitAllWork(pendingCommit);
}
}

这里使用了我们之前看到的performUnitOfWork模式。

workLoop()中判断deadline是不是有足够的时间来运行代码,如果不够,停止循环,回到performWork(),并且nextUnitOfWork还被保留为下次任务,在performWork()中判断是否还需要执行。

performUnitOfWork()的作用是构建 work-in-progress tree和找到哪些需要操作DOM的改变。这种处理方式是递增的,一次只处理一个fiber。

如果performUnitOfWork()完成了本次更新的所有工作,则renturn值为null,并且调用commitAllWork改变DOM。

至今为止,我们还没有看到第一个nextUnitOfWork是如何产生的

resetUnitOfWork()

fiber_resetUnitOfWork

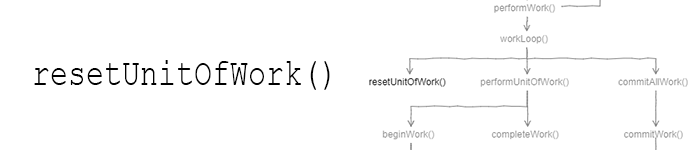
函数取出updateQueue第一项,将其转换成nextUnitOfWork.

1
2
3
4
5
6
7
8
9
10
11
12
13
14
15
16
17
18
19
20
21
22
23
24
25
26
27
28
29
30
31
function resetNextUnitOfWork() {
const update = updateQueue.shift();
if (!update) {
return;
}

// Copy the setState parameter from the update payload to the corresponding fiber
if (update.partialState) {
update.instance.__fiber.partialState = update.partialState;
}

const root =
update.from == HOST_ROOT
? update.dom._rootContainerFiber
: getRoot(update.instance.__fiber);

nextUnitOfWork = {
tag: HOST_ROOT,
stateNode: update.dom || root.stateNode,
props: update.newProps || root.props,
alternate: root
};
}

function getRoot(fiber) {
let node = fiber;
while (node.parent) {
node = node.parent;
}
return node;
}

如果update包含partialState, 就将其保存的对应fiber上,在后面会赋值给组件实例,已供render使用。

然后,我们找到old fiber树的根节点。如果update是first render调用的,root fiber将为null。如果是之后的render,root将等于_rootContainerFiber。如果update是因为setState(),则向上找到第一个没有patient属性的fiber。

然后我们将其赋值给nextUnitOfWork,注意,这个fiber将会是work-in-progress的根元素。

如果没有old root。stateNode将取render()中的参数。props将会是render()的另外一个参数。props中children是数组。alternate是 null。

如果有old root。stateNode是之前的root DOM node。props将会是newProps,如果其值不为null的话,否则就是原来的props。alternate就是之前的old root。

我们现在已经有了work-in-progress的根元素,让我们构造剩下的吧
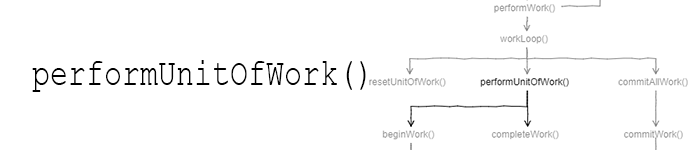
performUnitOfWork()

fiber_performUnitOfWork

1
2
3
4
5
6
7
8
9
10
11
12
13
14
15
16
17
function performUnitOfWork(wipFiber) {
beginWork(wipFiber);
if (wipFiber.child) {
return wipFiber.child;
}

// No child, we call completeWork until we find a sibling
let uow = wipFiber;
while (uow) {
completeWork(uow);
if (uow.sibling) {
// Sibling needs to beginWork
return uow.sibling;
}
uow = uow.parent;
}
}

performUnitOfWork() 遍历work-in-progress树

beginWork()的作用是创建子节点的fiber。并且将第一次子节点作为fiber的child属性

如果当前fiber没有子节点,我们就调用completeWork(),并且返回sibling作为下一个nextUnitOfWork.

如果没有sibling,就继续向上操作parent fiber。直到root。

总的来说,就是先处理叶子节点,然后是其兄弟节点,然后是双亲节点。从下往上遍历。

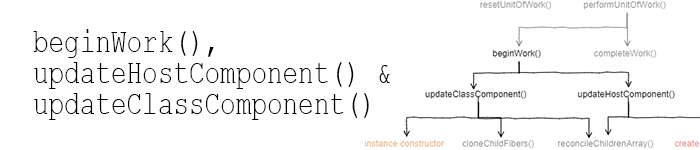
beginWork(), updateHostComponent(), updateClassComponent()

beginWork

1
2
3
4
5
6
7
8
9
10
11
12
13
14
15
16
17
18
19
20
21
22
23
24
25
26
27
28
29
30
31
32
33
34
unction beginWork(wipFiber) {
if (wipFiber.tag == CLASS_COMPONENT) {
updateClassComponent(wipFiber);
} else {
updateHostComponent(wipFiber);
}
}

function updateHostComponent(wipFiber) {
if (!wipFiber.stateNode) {
wipFiber.stateNode = createDomElement(wipFiber);
}
const newChildElements = wipFiber.props.children;
reconcileChildrenArray(wipFiber, newChildElements);
}

function updateClassComponent(wipFiber) {
let instance = wipFiber.stateNode;
if (instance == null) {
// Call class constructor
instance = wipFiber.stateNode = createInstance(wipFiber);
} else if (wipFiber.props == instance.props && !wipFiber.partialState) {
// No need to render, clone children from last time
cloneChildFibers(wipFiber);
return;
}

instance.props = wipFiber.props;
instance.state = Object.assign({}, instance.state, wipFiber.partialState);
wipFiber.partialState = null;

const newChildElements = wipFiber.stateNode.render();
reconcileChildrenArray(wipFiber, newChildElements);
}

beginWork()的作用有两个

  • 创建 stateNode
  • 拿到component children,并且调用 reconcileChildrenArray()

因为对不同类型component的处理方式不同, 这里分成了updateHostComponent, updateClassComponent两个函数。

updateHostComponennt 处理了host component 和 root component。如果fiber上没有DOM node则新建一个(仅仅是创建一个DOM节点,没有子节点,也没有插入到DOM中)。然后利用fiber props中的children去调用reconcileChildrenArray()

updateClassComponent 处理了用户创建的class component。如果没有实例则创建一个。并且更新了props和state,这样render就是可以计算出新的children。

updateClassComponent并不是每次都调用render函数。这有点类似于shouldCompnentUpdate函数。如果不需要调用render,就复制子节点。

现在我们有了newChildElements, 我们已经准备好去创建child fiber。

reconcileChildrenArray()

reconcileChildrenArray

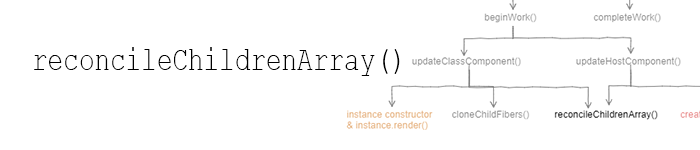
注意,这里是核心。这里创建了work-in-progress 树和决定如何更新DOM

1
2
3
4
5
6
7
8
9
10
11
12
13
14
15
16
17
18
19
20
21
22
23
24
25
26
27
28
29
30
31
32
33
34
35
36
37
38
39
40
41
42
43
44
45
46
47
48
49
50
51
52
53
54
55
56
57
58
59
60
61
62
63
/ Effect tags
const PLACEMENT = 1;
const DELETION = 2;
const UPDATE = 3;

function arrify(val) {
return val == null ? [] : Array.isArray(val) ? val : [val];
}

function reconcileChildrenArray(wipFiber, newChildElements) {
const elements = arrify(newChildElements);

let index = 0;
let oldFiber = wipFiber.alternate ? wipFiber.alternate.child : null;
let newFiber = null;
while (index < elements.length || oldFiber != null) {
const prevFiber = newFiber;
const element = index < elements.length && elements[index];
const sameType = oldFiber && element && element.type == oldFiber.type;

if (sameType) {
newFiber = {
type: oldFiber.type,
tag: oldFiber.tag,
stateNode: oldFiber.stateNode,
props: element.props,
parent: wipFiber,
alternate: oldFiber,
partialState: oldFiber.partialState,
effectTag: UPDATE
};
}

if (element && !sameType) {
newFiber = {
type: element.type,
tag:
typeof element.type === "string" ? HOST_COMPONENT : CLASS_COMPONENT,
props: element.props,
parent: wipFiber,
effectTag: PLACEMENT
};
}

if (oldFiber && !sameType) {
oldFiber.effectTag = DELETION;
wipFiber.effects = wipFiber.effects || [];
wipFiber.effects.push(oldFiber);
}

if (oldFiber) {
oldFiber = oldFiber.sibling;
}

if (index == 0) {
wipFiber.child = newFiber;
} else if (prevFiber && element) {
prevFiber.sibling = newFiber;
}

index++;
}
}

首先我们确定newChildElements是一个数组(并不像之前的diff算法,这次的算法的children总是数组,这意味着我们可以在render中返回数组)

然后,开始将old fiber中的children与新的elements做对比。还记得吗?fiber.alternate就是old fiber。new elements 来自于props.children(function)和 render(Class Component)。

reconciliation算法首先diff wipFiber.alternate.child 和 elements[0],然后是 wipFiber.alternate.child.sibling 和 elements[1]。这样一直遍历到遍历结束。

  • 如果oldFiber和element有相同的type。就通过old fiber创建新的。注意增加了UPDATE effectTag
  • 如果这两者有不同的type或者没有对应的oldFiber(因为我们新添加了子节点),就创建新的fiber。注意新fiber不会有alternate属性和stateNode(stateNode就会在beginWork()中创建)。还增加了PLACEMENT effectTag。
  • 如果这两者有不同的type或者没有对应的element(因为我们删除了一些子节点)。我们标记old fiber DELETION。

cloneChildFibers()

cloneChildFibers

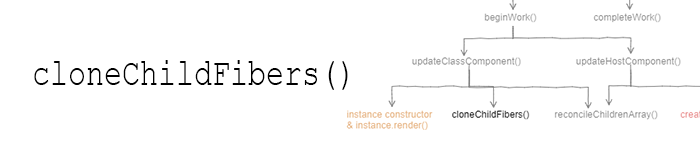
updateClassComponent中有一个特殊情况,就是不需要render,而是直接复制fiber。

1
2
3
4
5
6
7
8
9
10
11
12
13
14
15
16
17
18
19
20
21
22
23
24
25
26
27
function cloneChildFibers(parentFiber) {
const oldFiber = parentFiber.alternate;
if (!oldFiber.child) {
return;
}

let oldChild = oldFiber.child;
let prevChild = null;
while (oldChild) {
const newChild = {
type: oldChild.type,
tag: oldChild.tag,
stateNode: oldChild.stateNode,
props: oldChild.props,
partialState: oldChild.partialState,
alternate: oldChild,
parent: parentFiber
};
if (prevChild) {
prevChild.sibling = newChild;
} else {
parentFiber.child = newChild;
}
prevChild = newChild;
oldChild = oldChild.sibling;
}
}

cloneChildFibers()拷贝了old fiber的所有的子fiber。我们不需要增加effectTag,因为我们确定不需要改变什么。

completeWork()

fiber_completeWork

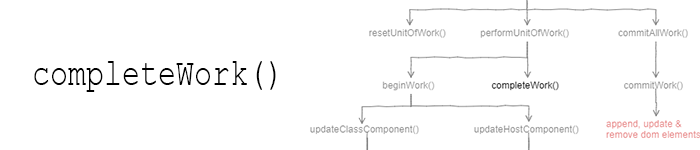
performUnitOfWork, 当wipFiber 没有新的子节点,或者我们已经处理了所有的子节点时,我们调用completeWork.

1
2
3
4
5
6
7
8
9
10
11
12
13
14
function completeWork(fiber) {
if (fiber.tag == CLASS_COMPONENT) {
fiber.stateNode.__fiber = fiber;
}

if (fiber.parent) {
const childEffects = fiber.effects || [];
const thisEffect = fiber.effectTag != null ? [fiber] : [];
const parentEffects = fiber.parent.effects || [];
fiber.parent.effects = parentEffects.concat(childEffects, thisEffect);
} else {
pendingCommit = fiber;
}
}

在 completeWork 中,我们新建了effects列表。其中包含了work-in-progress中所有包含effecTag。方便后面处理。最后我们将pendingCommit指向了root fiber。并且在workLoop中使用。

commitAllWork & commitWork
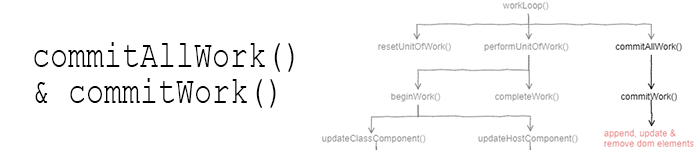
commitAllWork

这是最后一件我们需要做的事情,改变DOM。

1
2
3
4
5
6
7
8
9
10
11
12
13
14
15
16
17
18
19
20
21
22
23
24
25
26
27
28
29
30
31
32
33
34
35
36
37
38
39
40
41
42
43
44
45
46
function commitAllWork(fiber) {
fiber.effects.forEach(f => {
commitWork(f);
});
fiber.stateNode._rootContainerFiber = fiber;
nextUnitOfWork = null;
pendingCommit = null;
}

function commitWork(fiber) {
if (fiber.tag == HOST_ROOT) {
return;
}

let domParentFiber = fiber.parent;
while (domParentFiber.tag == CLASS_COMPONENT) {
domParentFiber = domParentFiber.parent;
}
const domParent = domParentFiber.stateNode;

if (fiber.effectTag == PLACEMENT && fiber.tag == HOST_COMPONENT) {
domParent.appendChild(fiber.stateNode);
} else if (fiber.effectTag == UPDATE) {
updateDomProperties(fiber.stateNode, fiber.alternate.props, fiber.props);
} else if (fiber.effectTag == DELETION) {
commitDeletion(fiber, domParent);
}
}

function commitDeletion(fiber, domParent) {
let node = fiber;
while (true) {
if (node.tag == CLASS_COMPONENT) {
node = node.child;
continue;
}
domParent.removeChild(node.stateNode);
while (node != fiber && !node.sibling) {
node = node.parent;
}
if (node == fiber) {
return;
}
node = node.sibling;
}
}

commitAllWork首先遍历了所有的根root effects。

  • PLACEMENT。将dom插入到父节点上
  • UPDATE。将新旧props交给updateDomProperties()处理。
  • DELETION。如果是Host component。用removeChild()删除就好。如果是class Component,那就要删除fiber subTree下面的所有host Component。

一旦我们完成了所有的effects,就重置nextUnitOfWork和pendingCommit。work-in-progress tree就变成了old tree。并复制给_rootContainerFiber。
这样我们完成了更新,并且做好了等待下一次更新的准备。

200行代码react(译)

发表于 2018-10-21 |

babel

在runtime时, babel转译器将对每一个节点都执行在编译注释(Pragma)中声明的函数。
例如:

before babel: (the code you write)

1
2
/** @jsx h */
let foo = <div id="foo">Hello!</div>;

after babel: (the code you run)

1
var foo = h('div', {id:"foo"}, 'Hello!');

也可以在浏览器里打印看一下结果:

1
2
3
4
5
6
7
8
9
10
11
12
13
14
15
16
17
18
19
20
21
22
23
24
25
26
27
28
<!DOCTYPE html>
<html lang="en">
<head>
<meta charset="UTF-8">
<meta name="viewport" content="width=device-width, initial-scale=1.0">
<meta http-equiv="X-UA-Compatible" content="ie=edge">
<title>Document</title>
</head>
<body>
<script src="https://unpkg.com/babel-standalone@6/babel.min.js"></script>
<script type="text/jsx" data-presets="es2016,react">
/** @jsx h */
let foo = <div id="foo">Hello!</div>;

const h = (type, attributes, ...args) => {
let children = args.length ? [].concat(...args) : null;
return { nodeName, attributes, children };
}

console.log(foo);
// foo: {
// attributes: {id: "foo"}
// children: ["Hello!"]
// nodeName: "div"
// }
</script>
</body>
</html>

createElement

将jsx中的element转换成 plain object

1
2
3
4
5
6
7
8
9
10
11
12
13
function createElement(type, config, ...args) {
const props = Object.assign({}, config);
const hasChildren = args.length > 0;
const rawChildren = hasChildren ? [].concat(...args) : [];
props.children = rawChildren
.filter(c => c != null && c !== false)
.map(c => c instanceof Object ? c : createTextElement(c));
return { type, props };
}

function createTextElement(value) {
return createElement(TEXT_ELEMENT, { nodeValue: value });
}

这里对text node特殊处理了一下,使其不那么特殊, 如此后面处理时省略了许多判断

instance

每个element(jsx转换而来的)对应一个instance,instance包含了dom, element, childInstances。
如果是custom component 则还有一个publicInstance,是组件的实例.

1
2
3
4
5
6
7
8
9
10
11
12
13
14
15
16
17
18
19
20
21
22
23
24
25
26
27
28
29
30
31
32
33
34
35
36
37
38
39
function instantiate(element) {
const { type, props } = element;
const isDomElement = typeof type === "string";

// 这里对custom component与built-in component分别做处理
if (isDomElement) {
const isTextElement = type === TEXT_ELEMENT;
const dom = isTextElement
? document.createTextNode("")
: document.createElement(type);

// updateDomProperties 作用是更新dom上的属性,比如class、id、或者删除新增事件监听函数等
updateDomProperties(dom, [], props);

// 处理子组件
const childElements = props.children || [];
const childInstances = childElements.map(instantiate);
const childDoms = childInstances.map(childInstance => childInstance.dom);

// 将子组件的实例插入到dom上
childDoms.forEach(childDom => dom.appendChild(childDom));

const instance = { dom, element, childInstances };
return instance;
} else {
const instance = {};
// 或者custom-component 实例
const publicInstance = createPublicInstance(element, instance);

// 调用render方法,获得子组件,再获取child instance.
// 注意这里是childInstance而不是childInstances,因为custom component只能一个子组件,不能是数组
const childElement = publicInstance.render();
const childInstance = instantiate(childElement);
const dom = childInstance.dom;

Object.assign(instance, { dom, element, childInstance, publicInstance });
return instance;
}
}

createPublicInstance

1
2
3
4
5
6
7
function createPublicInstance(element, internalInstance) {
const { type, props } = element;
const publicInstance = new type(props);

publicInstance.__internalInstance = internalInstance;
return publicInstance;
}

这里的internalInstance其实就是 instance,之所以需要将其绑定到组件实例上是因为
在自定义组件中update需要用到,这里可以先看一下Component的setState实现

1
2
3
4
5
6
7
8
9
10
setState(partialState) {
this.state = Object.assign({}, this.state, partialState);
updateInstance(this.__internalInstance);
}

function updateInstance(internalInstance) {
const parentDom = internalInstance.dom.parentNode;
const element = internalInstance.element;
reconcile(parentDom, internalInstance, element);
}

reconciliation 对组件进行 diff

下面instance是当前的状态,而element是新的状态,将这两者进行diff,就可以得出如何更新dom节点

1
2
3
4
5
6
7
8
9
10
11
12
13
14
15
16
17
18
19
20
21
22
23
24
25
26
27
28
29
30
31
32
33
34
35
36
37
38
39
40
41
42
43
44
45
46
47
48
49
50
51
52
53
function reconcile(parentDom, instance, element) {
if (instance == null) {
// 不存在instance则创建一个
const newInstance = instantiate(element);
parentDom.appendChild(newInstance.dom);
return newInstance;
} else if (element == null) {
// 不存在element说明该element已经被删除
parentDom.removeChild(instance.dom);
return null;
} else if (instance.element.type !== element.type) {
// 如果新旧element类型不同则替换
const newInstance = instantiate(element);
parentDom.replaceChild(newInstance.dom, instance.dom);
return newInstance;
} else if (typeof element.type === "string") {
// build-in component 更新属性
updateDomProperties(instance.dom, instance.element.props, element.props);
instance.childInstances = reconcileChildren(instance, element);
instance.element = element;
return instance;
} else {
// 更新custom component的属性
instance.publicInstance.props = element.props;
const childElement = instance.publicInstance.render();
const oldChildInstance = instance.childInstance;
const childInstance = reconcile(
parentDom,
oldChildInstance,
childElement
);
instance.dom = childInstance.dom;
instance.childInstance = childInstance;
instance.element = element;
return instance;
}
}

function reconcileChildren(instance, element) {
const dom = instance.dom;
const childInstances = instance.childInstances;
const nextChildElements = element.props.children || [];
const newChildInstances = [];
const count = Math.max(childInstances.length, nextChildElements.length);
for (let i = 0; i < count; i++) {
const childInstance = childInstances[i];
const childElement = nextChildElements[i];
const newChildInstance = reconcile(dom, childInstance, childElement);
newChildInstances.push(newChildInstance);
}
// 过滤掉已经被删除的element
return newChildInstances.filter(instance => instance != null);
}

Component

由于之前已经讲过了setState,其他部分就很简单了

1
2
3
4
5
6
7
8
9
10
11
class Component {
constructor(props) {
this.props = props;
this.state = this.state || {};
}

setState(partialState) {
this.state = Object.assign({}, this.state, partialState);
updateInstance(this.__internalInstance);
}
}

render

1
2
3
function render(element, container) {
reconcile(container, null, element);
}

一个完整的例子

1
2
3
4
5
6
7
8
9
10
11
12
13
14
15
16
17
18
19
20
21
22
23
24
25
26
27
28
29
30
31
32
33
34
35
36
37
38
39
40
41
42
43
44
45
46
47
48
49
50
51
52
53
54
55
56
57
58
59
60
61
62
63
64
65
66
67
68
69
70
71
72
73
74
75
76
77
78
79
80
81
82
83
84
85
86
87
88
89
90
91
92
93
94
95
96
97
98
99
100
101
102
103
104
105
106
107
108
109
110
111
112
113
114
115
116
117
118
119
120
121
122
123
124
125
126
127
128
129
130
131
132
133
134
135
136
137
138
139
140
141
142
143
144
145
146
147
148
149
150
151
152
153
154
155
156
157
158
159
160
161
162
163
164
165
166
167
168
169
170
171
172
173
174
175
176
177
178
179
180
181
182
183
184
185
186
187
188
189
190
191
192
193
194
195
196
197
198
199
200
201
202
203
204
205
206
207
208
209
<!DOCTYPE html>
<html lang="en">
<head>
<meta charset="UTF-8">
<meta name="viewport" content="width=device-width, initial-scale=1.0">
<meta http-equiv="X-UA-Compatible" content="ie=edge">
<title>Document</title>
</head>
<body>
<div id="root"></div>
<script src="https://unpkg.com/babel-standalone@6/babel.min.js"></script>
<script type="text/jsx" data-presets="es2016,react">
/** @jsx Didact.createElement */

const Didact = importFromBelow();
class App extends Didact.Component {

constructor(props) {
super(props);
this.state = { count: 0 };
}

add = () => {
this.setState({
count: this.state.count + 1,
})
}

render() {
return (
<div>
<h1>count: {this.state.count}</h1>
<Button onClick={this.add} />
</div>
);
}
}

class Button extends Didact.Component {
render() {
const { onClick } = this.props;

return (
<button onClick={onClick}>add</button>
);
}
}

Didact.render(<App />, document.getElementById("root"));

function importFromBelow() {
let rootInstance = null;
const TEXT_ELEMENT = "TEXT_ELEMENT";

function createElement(type, config, ...args) {
const props = Object.assign({}, config);
const hasChildren = args.length > 0;
const rawChildren = hasChildren ? [].concat(...args) : [];
props.children = rawChildren
.filter(c => c != null && c !== false)
.map(c => c instanceof Object ? c : createTextElement(c));
return { type, props };
}

function createTextElement(value) {
return createElement(TEXT_ELEMENT, { nodeValue: value });
}

function render(element, container) {
const prevInstance = rootInstance;
const nextInstance = reconcile(container, prevInstance, element);
rootInstance = nextInstance;
}

function reconcile(parentDom, instance, element) {
if (instance == null) {
const newInstance = instantiate(element);
parentDom.appendChild(newInstance.dom);
return newInstance;
} else if (element == null) {
parentDom.removeChild(instance.dom);
return null;
} else if (instance.element.type !== element.type) {
const newInstance = instantiate(element);
parentDom.replaceChild(newInstance.dom, instance.dom);
return newInstance;
} else if (typeof element.type === "string") {
updateDomProperties(instance.dom, instance.element.props, element.props);
instance.childInstances = reconcileChildren(instance, element);
instance.element = element;
return instance;
} else {
instance.publicInstance.props = element.props;
const childElement = instance.publicInstance.render();
const oldChildInstance = instance.childInstance;
const childInstance = reconcile(
parentDom,
oldChildInstance,
childElement
);
instance.dom = childInstance.dom;
instance.childInstance = childInstance;
instance.element = element;
return instance;
}
}

function reconcileChildren(instance, element) {
const dom = instance.dom;
const childInstances = instance.childInstances;
const nextChildElements = element.props.children || [];
const newChildInstances = [];
const count = Math.max(childInstances.length, nextChildElements.length);
for (let i = 0; i < count; i++) {
const childInstance = childInstances[i];
const childElement = nextChildElements[i];
const newChildInstance = reconcile(dom, childInstance, childElement);
newChildInstances.push(newChildInstance);
}
return newChildInstances.filter(instance => instance != null);
}

function instantiate(element) {
const { type, props } = element;
const isDomElement = typeof type === "string";

if (isDomElement) {
const isTextElement = type === TEXT_ELEMENT;
const dom = isTextElement
? document.createTextNode("")
: document.createElement(type);

updateDomProperties(dom, [], props);

const childElements = props.children || [];
const childInstances = childElements.map(instantiate);
const childDoms = childInstances.map(childInstance => childInstance.dom);
childDoms.forEach(childDom => dom.appendChild(childDom));

const instance = { dom, element, childInstances };
return instance;
} else {
const instance = {};
const publicInstance = createPublicInstance(element, instance);
const childElement = publicInstance.render();
const childInstance = instantiate(childElement);
const dom = childInstance.dom;

Object.assign(instance, { dom, element, childInstance, publicInstance });
return instance;
}
}

function updateDomProperties(dom, prevProps, nextProps) {
const isEvent = name => name.startsWith("on");
const isAttribute = name => !isEvent(name) && name != "children";

Object.keys(prevProps).filter(isEvent).forEach(name => {
const eventType = name.toLowerCase().substring(2);
dom.removeEventListener(eventType, prevProps[name]);
});

Object.keys(prevProps).filter(isAttribute).forEach(name => {
dom[name] = null;
});

Object.keys(nextProps).filter(isAttribute).forEach(name => {
dom[name] = nextProps[name];
});

Object.keys(nextProps).filter(isEvent).forEach(name => {
const eventType = name.toLowerCase().substring(2);
dom.addEventListener(eventType, nextProps[name]);
});
}
function createPublicInstance(element, internalInstance) {
const { type, props } = element;
const publicInstance = new type(props);
publicInstance.__internalInstance = internalInstance;
return publicInstance;
}

class Component {
constructor(props) {
this.props = props;
this.state = this.state || {};
}

setState(partialState) {
this.state = Object.assign({}, this.state, partialState);
updateInstance(this.__internalInstance);
}
}

function updateInstance(internalInstance) {
const parentDom = internalInstance.dom.parentNode;
const element = internalInstance.element;
reconcile(parentDom, internalInstance, element);
}

return {
createElement,
render,
Component
};
}
</script>
</body>
</html>

总结

本文是对文章Didact: a DIY guide to build your own React 的总结。旨在帮助我在阅读react源码之前先整体把握react的结构组成,帮助我更好的阅读源码。由于react16大量更新了代码,引入了Fiber:Incremental reconciliation,下篇看一下fiber的简单的实现。是同一位作者所写。

参考文章

wtf-is-jsx
DIY React

dva-源码解析-下

发表于 2018-10-07 |

首先这是一篇找妈妈的故事, model中的state,reducers,effects,是如何找到各自的妈妈呢?23333~

dva 是对redux、react-redux、react-router、redux-saga的整合,所以在看dva源码之前建议先要熟悉这些库的用法。
废话不多说,那我们就开始。先看一下生成的 index.js 文件,在这里我加入了dva-loading,用来分析plugin。

1
2
3
4
5
6
7
8
9
10
11
12
13
14
15
16
17
import dva from 'dva';
import createLoading from 'dva-loading';

// 1. Initialize
const app = dva();

// 2. Plugins
app.use(createLoading());

// 3. Model
app.model(require('./models/example').default);

// 4. Router
app.router(require('./router').default);

// 5. Start
app.start('#root');

可以看到,dva生成app实例,并且绑定plugin、models、router,最后启动项目。

先去看一下dva的源码,位置是dva/src/index.js

1
2
3
4
5
6
7
8
9
10
11
12
13
14
15
16
17
18
19
20
21
22
23
24
25
26
27
28
29
30
31
32
33
34
35
36
37
38
39
40
41
42
43
44
45
46
47
export default function (opts = {}) {
const history = opts.history || createHashHistory();
const createOpts = {
initialReducer: {
routing,
},
setupMiddlewares(middlewares) {
return [
routerMiddleware(history),
...middlewares,
];
},
setupApp(app) {
app._history = patchHistory(history);
},
};

const app = core.create(opts, createOpts);
const oldAppStart = app.start;
app.router = router;
app.start = start;
return app;

function router(router) {
app._router = router;
}

function start(container) {
// 允许 container 是字符串,然后用 querySelector 找元素
if (isString(container)) {
container = document.querySelector(container);
}

if (!app._store) {
oldAppStart.call(app);
}
const store = app._store;

// If has container, render; else, return react component
if (container) {
render(container, store, app, app._router);
app._plugin.apply('onHmr')(render.bind(null, container, store, app));
} else {
return getProvider(store, this, this._router);
}
}
}

上面代码重点在两句

  • const app = core.create(opts, createOpts); 利用dva-core生成数据层app
  • app.start = start; 由于dva-core仅仅是数据层,所以这里需要代理start方法,建立view层,比如react、router

接下来我想会重点分析model方法(这是整个dva的核心部分) 位置是dva-core/index.js

1
2
3
4
5
6
7
8
9
10
11
12
13
14
15
16
17
18
19
20
21
22
23
24
25
26
export function create(hooksAndOpts = {}, createOpts = {}) {
const { initialReducer, setupApp = noop } = createOpts;

const plugin = new Plugin();
plugin.use(filterHooks(hooksAndOpts));

const app = {
_models: [prefixNamespace({ ...dvaModel })],
_store: null,
_plugin: plugin,
use: plugin.use.bind(plugin),
model,
start,
};
return app;

// 注册model,将model里的reducers与effects方法增加namespace,并且保存在app._models中
function model(m) {
if (process.env.NODE_ENV !== 'production') {
checkModel(m, app._models);
}
const prefixedModel = prefixNamespace({ ...m });
app._models.push(prefixedModel);
return prefixedModel;
}
}

在一个项目中我们会注册多个model,现在models都已经被存在了app_models中。dva是如何将每个model里的state,reducers, effects,
放在redux与redux-saga中的呢?答案就在 app.start 里。start里主要是redux和redux-saga的初始化

1
2
3
4
5
6
7
8
9
10
const reducers = { ...initialReducer };
for (const m of app._models) {
reducers[m.namespace] = getReducer(
m.reducers,
m.state,
plugin._handleActions
);
if (m.effects)
sagas.push(app._getSaga(m.effects, m, onError, plugin.get('onEffect')));
}

上面代码遍历models分别将reducers和effects存下来,先看一下reducer的处理

1
2
3
4
5
6
7
8
9
10
11
export default function getReducer(reducers, state, handleActions) {
// Support reducer enhancer
// e.g. reducers: [realReducers, enhancer]
if (Array.isArray(reducers)) {
return reducers[1](
(handleActions || defaultHandleActions)(reducers[0], state)
);
} else {
return (handleActions || defaultHandleActions)(reducers || {}, state);
}
}

一般情况下都不会是数组,话说看到这里我才知道原来还可以加一个enhancer。在去看一下defaultHandleActions

1
2
3
4
5
6
7
function handleActions(handlers, defaultState) {
const reducers = Object.keys(handlers).map(type =>
handleAction(type, handlers[type])
);
const reducer = reduceReducers(...reducers);
return (state = defaultState, action) => reducer(state, action);
}

在这里遍历了reducers里的每一个key值,并把一个models下的reduers合并为一个。

1
2
3
4
5
6
7
8
9
10
function handleAction(actionType, reducer = identify) {
return (state, action) => {
const { type } = action;
invariant(type, 'dispatch: action should be a plain Object with type');
if (actionType === type) {
return reducer(state, action);
}
return state;
};
}

关键在于 if (actionType === type), 判断类型不同就返回state,类似于 switch…case。
下面看一下合并reducer的函数

1
2
3
4
function reduceReducers(...reducers) {
return (previous, current) =>
reducers.reduce((p, r) => r(p, current), previous);
}

这里的合并方式我是有点不太理解的,
这里采用的是reducer1 -> reducer2 -> reducer3,假如有一个action,models里的handleAction要全跑一遍。
为什么不直接找到相应键值的reducer运行呢?,reducer已经分析完了然后就是effects

1
2
3
4
5
6
7
8
9
10
11
12
13
14
export default function getSaga(effects, model, onError, onEffect) {
return function*() {
for (const key in effects) {
if (Object.prototype.hasOwnProperty.call(effects, key)) {
const watcher = getWatcher(key, effects[key], model, onError, onEffect);
const task = yield sagaEffects.fork(watcher);
yield sagaEffects.fork(function*() {
yield sagaEffects.take(`${model.namespace}/@@CANCEL_EFFECTS`);
yield sagaEffects.cancel(task);
});
}
}
};
}

fork每一个effect,然后是 getWatcher 函数

1
2
3
4
5
6
7
8
9
10
11
12
13
14
15
16
17
18
19
20
21
22
23
24
25
26
27
28
29
30
31
32
33
34
35
36
37
38
39
40
41
42
43
44
// onEffect就是plugin中的OnEffect, 就如开头的那个例子dva-loading中就有一个onEffect
function getWatcher(key, _effect, model, onError, onEffect) {
// 这里给每一个effect增加了开始、结束的事件和错误处理,并且__dva_resolve, __dva_reject是PromiseMiddleware的参数。
// PromiseMiddleware的作用是当你dispatch effect时,返回一个promise。this.props.dispatch.then这样的写法你一定熟悉。
function* sagaWithCatch(...args) {
const { __dva_resolve: resolve = noop, __dva_reject: reject = noop } =
args.length > 0 ? args[0] : {};
try {
yield sagaEffects.put({ type: `${key}${NAMESPACE_SEP}@@start` });
// createEffects 封装了redux-saga的effects,主要是改变了type值,这就是你为什么可以在当前model里省略namespace的原因
const ret = yield effect(...args.concat(createEffects(model)));
yield sagaEffects.put({ type: `${key}${NAMESPACE_SEP}@@end` });
resolve(ret);
} catch (e) {
onError(e, {
key,
effectArgs: args,
});
if (!e._dontReject) {
reject(e);
}
}
}

// 如果插件中有onEffects,则再封装一层
const sagaWithOnEffect = applyOnEffect(onEffect, sagaWithCatch, model, key);

switch (type) {
case 'watcher':
return sagaWithCatch;
case 'takeLatest':
return function*() {
yield takeLatest(key, sagaWithOnEffect);
};
case 'throttle':
return function*() {
yield throttle(ms, key, sagaWithOnEffect);
};
default:
return function*() {
yield takeEvery(key, sagaWithOnEffect);
};
}
}

到目前为止我们已经处理好了reduer与effects,接下来就是redux与redux-saga的初始化工作了
首先是redux

1
2
3
4
5
6
7
8
9
const store = (app._store = createStore({
// eslint-disable-line
reducers: createReducer(),
initialState: hooksAndOpts.initialState || {},
plugin,
createOpts,
sagaMiddleware,
promiseMiddleware,
}));

redux-saga

1
sagas.forEach(sagaMiddleware.run);

ola, dva的源码差不多就到这里了,再去看一个dva-loading是如何工作的。
先想一下dva-loading作用是监听effects的开始和结束,并把状态存在store里,那么他肯定需要一个reducer用来存储状态,和effect用来抛出action

1
2
3
4
5
6
7
8
9
10
11
12
13
14
15
16
17
18
19
20
21
22
23
24
25
26
27
28
29
30
31
32
33
34
35
36
37
38
39
40
41
42
43
44
45
46
const initialState = {
global: false,
models: {},
effects: {},
};

const extraReducers = {
[namespace](state = initialState, { type, payload }) {
const { namespace, actionType } = payload || {};
let ret;
switch (type) {
case SHOW:
ret = {
...state,
global: true,
models: { ...state.models, [namespace]: true },
effects: { ...state.effects, [actionType]: true },
};
break;
case HIDE: // eslint-disable-line
res = {...}
break;
default:
ret = state;
break;
}
return ret;
},
};

function onEffect(effect, { put }, model, actionType) {
const { namespace } = model;
if (
(only.length === 0 && except.length === 0)
|| (only.length > 0 && only.indexOf(actionType) !== -1)
|| (except.length > 0 && except.indexOf(actionType) === -1)
) {
return function*(...args) {
yield put({ type: SHOW, payload: { namespace, actionType } });
yield effect(...args);
yield put({ type: HIDE, payload: { namespace, actionType } });
};
} else {
return effect;
}
}

onEffect在之前getWatcher中已经讲过,而extraReducers最后会通过combineReducers合并

总结

dva的源码已经分析完了,看完这篇文章相信你已经对dva的工作方式有了大致的了解。下期我会分享react源码。

dva-源码解析

发表于 2018-10-06 |

dva-cli

dva 的命令行工具
原理就是当运行 dva new my-app 时,dva-cli 就将其项目中的boilerplates文件夹拷贝到process.cwd()目录下。并且运行npm install安装项目依赖。

查看 package.json 入口在bin/dva

1
2
3
4
5
6
7
8
9
10
11
12
13
14
15
16
17
18
19
20
21
22
23
24
25
26
27
28
29
30
31
32
33
34
35
36
37
38
39
40
41
42
43
44
45
46
47
48
49
// Notify update when process exits
const updater = require('update-notifier');
const pkg = require('../package.json');
updater({ pkg: pkg }).notify({ defer: true });

// dva -v
if (process.argv.slice(2).join('') === '-v') {
// ...
}

program
.usage('<command> [options]')
.on('--help', printHelp)
.parse(process.argv);

const aliases = {
g: 'generate',
};
const args = process.argv.slice(3);

// new、generate
let subcmd = program.args[0];
if (aliases[subcmd]) subcmd = aliases[subcmd];

if (!subcmd) {
program.help();
} else {
const bin = executable(subcmd);
if (bin) {
// 执行文件
wrap(spawn(bin, args, {stdio: 'inherit', customFds: [0, 1, 2]}));
} else {
program.help();
}
}

function wrap(sp) {
sp.on('close', function(code) {
process.exit(code);
});
}

// 检查是不是有相应 subcmd 的执行文件
function executable(subcmd) {
var file = join(__dirname, 'dva-' + subcmd);
if (exists(file)) {
return file;
}
}

bin/dva 是dva-cli的入口文件,其中定义了-v命令以及执行相应的subcmd命令。如果你输入了dva new my-app,那么将会执行bin/dva-new,下面看下bin/dva-new文件

1
2
3
4
5
6
7
8
9
10
11
12
13
14
15
16
// 没有定义项目名称
if (!program.args[0]) {
program.help();
} else {
const dest = join(process.cwd(), program.args[0]);
// 如果已经存在该项目
if (existsSync(dest)) {
console.error(error('Existing directory here, please run new command for an empty folder!'));
process.exit(1);
}
// 创建目录
mkdirpSync(dest);
// 进入目录
process.chdir(dest);
require('../lib/init')(program);
}

bin/dva-new 检查了命令的有效性,并且创建、进入项目目录,执行dva-init初始化项目,下面去看一下bin/dva-init

1
2
3
4
5
6
program
.option('--demo', 'Generate dva project for demo')
.option('--no-install', 'Install dependencies after boilerplate, default: true')
.parse(process.argv);

require('../lib/init')(program);

定义了两个配置项,然后又调用了lib/init,由于lib文件夹是打包出来的,先去看一下src/init文件吧

1
2
3
4
5
6
7
8
9
10
11
12
13
14
15
16
17
18
19
20
21
22
23
24
25
26
27
28
29
30
31
32
33
34
35
36
function init({ demo, install }) {
const type = demo ? 'demo' : 'app';
// __dirname 为执行文件所在的目录
const cwd = join(__dirname, '../boilerplates', type);
const dest = process.cwd();
const projectName = basename(dest);

if (!emptyDir(dest)) {
error('Existing files here, please run init command in an empty folder!');
process.exit(1);
}

console.log(`Creating a new Dva app in ${dest}.`);
console.log();

// vfs:文件流处理工具,将boilerplates中的文件拷贝到process.cwd目录下,
// 如果install为true的话,则执行src/install
vfs.src(['**/*', '!node_modules/**/*'], {cwd: cwd, cwdbase: true, dot: true})
.pipe(template(dest, cwd))
.pipe(vfs.dest(dest))
.on('end', function() {
info('rename', 'gitignore -> .gitignore');
renameSync(join(dest, 'gitignore'), join(dest, '.gitignore'));
if (install) {
info('run', 'npm install');
require('./install')(printSuccess);
} else {
printSuccess();
}
})
.resume();

function printSuccess() {
//...
}
}

src/install 会去根据系统安装的依赖管理工具进行install操作

1
2
3
4
5
6
7
8
9
10
11
12
13
14
15
16
17
18
19
20
21
22
23
24
25
// 好吧 竟然没有yarn
function findNpm() {
var npms = process.platform === 'win32' ? ['tnpm.cmd', 'cnpm.cmd', 'npm.cmd'] : ['tnpm', 'cnpm', 'npm'];
for (var i = 0; i < npms.length; i++) {
try {
which.sync(npms[i]);
console.log('use npm: ' + npms[i]);
return npms[i];
} catch (e) {
}
}
throw new Error('please install npm');
}
export default function (done) {
const npm = findNpm();
// 因为boilerplates/package.json 中没有dva,所以在运行install之后,再安装dva,why?
// 为什么不干脆将dva写在boilerplates/package.json里呢,
// 因为这样就可以保证每次安装的dva都是最新版本啊 骚年。
runCmd(which.sync(npm), ['install'], function () {
runCmd(which.sync(npm), ['install', 'dva', '--save'], function () {
console.log(npm + ' install end');
done();
});
});
};

在上面我们已经分析了dva new的相关命令,其实dva还支持generate操作(文档上是这么说的),不过。。。我们来看下generate文件

1
2
3
4
5
6
7
//...
console.log(chalk.red('😢 dva generate is disabled since we don\'t have enough time currently.'));
process.exit(0);

require('../lib/generate')(program, {
cwd: process.cwd(),
});

四个字,暂未开放… 这个文档更新有点落后啊。dva-generate中又依赖了dva-ast 其中主要使用了 facebook/jscodeshift这个库,作用是解析js,将js内容解析成 AST 语法树,然后提供一些便利的操作接口,方便我们对各个节点进行更改,比如更改所有的属性名之类的。感兴趣的同学可以自己去研究一下,就送到这里啦~ dva-cli就分析到这里了,接下来我会去分析dva。

数据结构与算法

发表于 2018-09-26 |

复杂度分析

为什么要进行复杂度分析

  • 和性能测试相比,有不依赖执行环境、成本低、效率高的特点
  • 掌握复杂度分析,将能编写出性能更高的代码,有利于降低系统开发和维护的成本

复杂度分析

  • 时间复杂度: 不具体表示代码的真正的执行时间,而是表示代码执行时间随数据规模增长的变化趋势
  • 空间复杂度: 代码所占空间随数据规模增长的变化趋势

时间复杂度分析

  • 加法法则(总复杂度等于量级最大的那段代码的复杂度)

    1
    2
    3
    4
    5
    6
    7
    8
    9
    function sum(n) {
    var sum = 0;
    for(var i = 0; i <= n; i++) {
    sum = sum + i;
    }
    return sum;
    }
    // var sum = 0; 为常量级的执行时间与n的大小无关
    // for 循环 的两行代码需要执行n次,所以这个函数的时间复杂度为O(n)
  • 乘法法则(嵌套代码的复杂度等于嵌套内外代码的乘积)

    1
    2
    3
    4
    5
    6
    7
    8
    9
    function cal(n) {
    var res = 0;
    for(var i = 0; i <= n; i++) {
    for(var j = 0; j <= n; j++) {
    res = res + i + j;
    }
    }
    }
    // O(n * n) = O(n2)

时间复杂度量级 从小到大

  • O(1)
  • O(logn)
  • O(n)
  • O(nlogn) 归并排序 快速排序
  • O(n^2), O(n^3)…
  • O(2^n) 非多项式
  • O(n!) 非多项式

当有多个参数变化时,加法原则就不适用了,但乘法还是适用

1
2
3
4
function cal(m, n) {
return sum(m) + sum(n);
}
// 时间复杂度 O(m + n)

空间复杂度分析

时间复杂度会了,空间复杂度很简单

最好情况时间复杂度、最坏情况时间复杂度、平均情况时间复杂度、均摊时间复杂度

1
2
3
4
5
6
7
8
9
function find(array, x) {
let pos = -1;
for(let i = 0; i < array.length; ++i) {
if (array[i] === x) {
pos = i;
}
}
return pos;
}

最好、最坏情况时间复杂度

这段代码是在array中查找x值。时间复杂度为O(n),如果查找到相等值就立即停止,那么时间复杂度就分两种情况
最好情况时间复杂度为O(1), 最坏情况时间复杂度为O(n)
因为x在array中的位置有n+1种可能那么平均时间复杂度为(1+2+3…+n+n)/(n+1),用大O表示法就是O(n),但是这样计算是有些问题的。
因为x在数组里和不在数组里的概率都是1/2。所以x出现在0-n-1中任意位置的概率都为1/2n,所以(1+2+3+…n)*1/2n + n*1/2 = (3n + 1) / 4; 结果还是O(n)

均摊时间复杂度 方法:平摊分析

1
2
3
4
5
6
7
8
9
10
11
12
13
14
15
const array = new Array(10);
const count = 0;
function insert(x) {
if (count === array.length) {
let sum = 0;
for (let i = 0; i<array.length; i++) {
sum += array[i];
}
array[0] = x;
count = 0;
}

array[count] = val;
++count;
}

当array已满时,对array求和放在开头,然后再insert。
最好:O(1)
最坏:O(n)
平均:O(1)
均摊:O(1),将1次的O(n)操作均摊到n - 1次的O(1)操作中
当对一个数据结构进行一组连续的操作时,大部分的情况下时间复杂度都很低,可以利用均摊分析法了。

数组

为什么数组序号从0开始

数组一个线性表结构。用一组连续的内存空间,来存储一组具有相同类型的数据。这就使得数组支持根据下标随机访问。
a[k].address = base.address + k type.size
a[k].address = base.address + (k - 1)
type.size
相比之下,数组序号从1开始会多一次减法运算,再加上c语言采用这种方式,所以。。。

JVM 标记清除垃圾回收算法

将要释放清除的对象标记,之后再执行清除操作,缺点是会产生内存碎片的问题,很有可能导致下一次分配一块连续较大的内存空间,由于找不到合适的,又触发一次垃圾回收操作。

链表

约瑟夫问题 可以用循环链表实现

1
2
3
4
5
6
7
function f(n, m) {
let s = 0;
for (let i = 2; i <= n; i++) {
s = (s + m) % i;
}
return s;
}

链表练习题:

  • 单链表反转
  • 链表中环的检测
  • 两个有序的链表合并
  • 删除链表倒数的第n个节点
  • 求链表的中间节点

redux-saga源码解析-下

发表于 2018-09-26 |

这篇文中是对 redux-saga源码解析 的补充,可以帮助大家更加全面的了解redux-saga。主要探索一下 channel, 和redux-saga中的取消任务
想要具体分析一下channel并不是因为多么复杂,而是工作中可能会用到

channel

在前一篇文章中说到其实redux-saga支持三种channel,分别是channel, eventChannel, multicastChannel。multicastChannel 在前一篇文章已经分析过。这里就看一下另外两个。

channel

接受一个buffer对象,返回 channel 对象
buffer的作用:当没有任务监听器时,先把事件缓存起来,如果后面有新的任务监听器建立,就立即执行任务。

1
2
3
4
5
6
7
8
9
10
11
12
13
14
15
16
17
18
19
20
21
22
23
24
25
26
27
28
29
30
31
32
33
34
35
36
37
38
39
40
41
42
43
44
45
46
47
48
49
50
51
52
53
54
55
56
57
58
59
60
61
62
63
64
65
66
67
export function channel(buffer = buffers.expanding()) {
let closed = false
let takers = []

function put(input) {
// 如果 channel 已经关闭,返回
if (closed) {
return
}
// 当没有任务监听器时, 缓存在 buffer 里
if (takers.length === 0) {
return buffer.put(input)
}

// 正常执行任务
const cb = takers.shift()
cb(input)
}

function take(cb) {
// 如果 channel 已经关闭并且buffer为空,则对任务发送END信号
// 也可以看出来,即使 channel 关闭,buffer只要不为空,还是可以正常建立任务监听器的
if (closed && buffer.isEmpty()) {
cb(END)
} else if (!buffer.isEmpty()) {
// buffer不为空的话 直接执行
cb(buffer.take())
} else {
// 正常建立任务监听器
takers.push(cb)
cb.cancel = () => remove(takers, cb)
}
}

// 清空buffer里的任务
function flush(cb) {
//...
if (closed && buffer.isEmpty()) {
cb(END)
return
}
cb(buffer.flush())
}

// 当关闭channel时,终止所有任务监听器
function close() {
//...
if (!closed) {
closed = true
if (takers.length) {
const arr = takers
takers = []
for (let i = 0, len = arr.length; i < len; i++) {
const taker = arr[i]
taker(END)
}
}
}
}

return {
take,
put,
flush,
close,
};
}

eventChannel

eventChannel 是对 channel的封装,主要区别是 channel.put 函数交给subscribe函数驱动

1
2
3
4
5
6
7
8
9
10
11
12
13
14
15
16
17
18
19
20
21
22
23
24
25
26
27
28
29
30
31
32
33
34
35
36
37
export function eventChannel(subscribe, buffer = buffers.none()) {
let closed = false
let unsubscribe

const chan = channel(buffer)
const close = () => {
if (is.func(unsubscribe)) {
unsubscribe()
}
chan.close()
}

unsubscribe = subscribe(input => {
if (isEnd(input)) {
close()
closed = true
return
}
chan.put(input)
})

if (!is.func(unsubscribe)) {
throw new Error('in eventChannel: subscribe should return a function to unsubscribe')
}

unsubscribe = once(unsubscribe)

if (closed) {
unsubscribe()
}

return {
take: chan.take,
flush: chan.flush,
close,
}
}

example:

1
2
3
4
5
// 这个channel刚建立就被关闭了
eventChannel(emitter => {
emitter(END)
return () => {}
})

cancel

1
2
3
4
5
6
7
8
9
10
11
12
13
14
15
16
17
18
19
20
function* test(action) {
try {
yield call(delayUtil, 5000);
yield put({ type: 'ADD_TODO', text: action.text });
} finally {
if (yield cancelled()) {
console.log('cancelled');
}
}
}

function* rootSaga() {
const action = yield take('ADD_TODO_SAGA');
const task = yield fork(test, action);

yield call(delayUtil, 4000);
yield cancel(task);
}

sagaMiddleware.run(rootSaga)

这里首先监听了ADD_TODO_SAGA事件,在4s之后又取消了任务,由于在子任务中延时了5s,所以 ADD_TODO 并没有被抛出。

cancel effect

1
2
3
4
5
function cancelSingleTask(taskToCancel) {
if (taskToCancel.isRunning()) {
taskToCancel.cancel()
}
}

可以看到调用task的cancel方法。

1
2
3
4
5
6
function cancel() {
if (task._isRunning && !task._isCancelled) {
task._isCancelled = true
taskQueue.cancelAll()
}
}

实际执行的就是 taskQueue.cancelAll() 在这里取消了任务及其子任务。

cancelled effect

1
2
3
function runCancelledEffect(data, cb) {
cb(Boolean(mainTask._isCancelled))
}

直接将_isCancelled作为结果

由于取消任务是在父线程上作的,所以应该通知到子线程上。
原理是当迭代器运行return方法时,iterator.return() 函数就会跳过try剩下的语句,直接进入finally代码块。这里改造一下之前的自动流程控制demo

1
2
3
4
5
6
7
8
9
10
11
12
13
14
15
16
17
18
19
20
21
22
23
24
25
26
27
28
29
30
31
32
33
34
const delay = (ms) => {
return new Promise((res) => {
setTimeout(res, ms);
});
}

function *main() {
try {
console.log('begin');
yield delay(1000);
console.log('1s later');
yield delay(2000);
console.log('end');
} finally {
console.log('finally');
}
}

function autoRun(gfunc) {
const gen = gfunc();

function next() {
const res = gen.next();
gen.return('cancel');
if (res.done) return;
res.value.then(next);
}

next();
}

autoRun(main);
// begin
// finish

可以看到直接进入了finally代码块。

总结

这边文章主要是对前一篇文章的补充,探索了一下我比较感兴趣的两个点,也希望读者看完之后会有所帮助。
接下来我会分析一下dva(基于 redux、redux-saga 和 react-router 的轻量级前端框架)

redux-saga源码解析

发表于 2018-09-09 |

Redux-saga是redux应用的又一个副作用模型。可以用来替换redux-thunk中间件。
redux-saga 抽象出 Effect (影响, 例如等待action、发出action、fetch数据等等),便于组合与测试。

我想在分析redux-saga之前,先来看看redux-thunk是怎么一回事
redux 在我之前一篇文章中讲过了链接
那我们就先用 redux-thunk 来写一个 asyncTodo 的demo

redux-thunk 分析

1
2
3
4
5
6
7
8
9
10
11
12
13
14
15
16
17
18
19
20
21
22
23
24
25
26
27
28
29
30
31
32
33
34
35
36
37
38
import { createStore, applyMiddleware } from 'redux';
const thunk = ({ dispatch, getState }) => next => action => {
if (typeof action === 'function') {
return action(dispatch, getState);
}

return next(action);
}

const logger = ({ getState }) => next => action => {
console.log('will dispatch', getState());
next(action)
console.log('state after dispatch', getState());
}

const todos = (state = [], action) => {
switch (action.type) {
case 'ADD_TODO':
return [
...state,
action.text
];
default:
return state
}
}

const store = createStore(
todos,
['Use Redux'],
applyMiddleware(logger, thunk),
);

store.dispatch(dispatch => {
setTimeout(() => {
dispatch({ type: 'ADD_TODO', text: 'Read the docs' });
}, 1000);
});

原本redux中action只能是 plain object ,redux-thunk使action可以为function。当我们想抛出一个异步的action时,其实我们是把异步的处理放在了actionCreator中。
这样就会导致action形式不统一,并且对于异步的处理将会分散到各个action中,不利于维护。
接下来看看redux-saga是如何实现的

redux-saga

1
2
3
4
5
6
7
8
9
10
11
12
13
14
15
16
17
18
19
20
21
22
23
24
25
26
27
28
29
30
31
32
33
34
import { createStore, applyMiddleware } from 'redux';
import createSagaMiddleware from 'redux-saga';
import { put, take, fork, delay } from './redux-saga/effects'
import { delay as delayUtil } from 'redux-saga/utils';

// 获取redux中间件
const sagaMiddleware = createSagaMiddleware({
sagaMonitor: {
// 打印 effect 便于分析redux-saga行为
effectTriggered(options) {
console.log(options);
}
}
})

function* rootSaga() {
const action = yield take('ADD_TODO_SAGA');
// delay(): { type: 'call', payload: { args: [1000], fn }}
yield delay(1000); // or yield call(delayUtil, 1000)

// put(): { type: 'PUT', payload: { action: {}, channel: null }}
yield put({ type: 'ADD_TODO', text: action.text });
}

const store = createStore(
todos,
['Use Redux'],
applyMiddleware(logger, sagaMiddleware),
);

// 启动saga
sagaMiddleware.run(rootSaga);

store.dispatch({ type: 'ADD_TODO_SAGA', text: 'Use Redux-saga' });

可以看到这里抛出的就是一个纯action, saga在启动之后监听 ADD_TODO_SAGA 事件,若事件发生执行后续代码。

源码

stdChannel

在开始createSagaMiddleware之前,先来了解一下 channel
redux-saga 通过 channel 接收与发出action与外部进行数据交换
在redux-saga中有三种 channel,分别是channel、eventChannel、multicastChannel;
在此我们仅仅分析一下用的最多的 multicastChannel

1
2
3
4
5
6
7
8
9
10
11
12
13
14
15
16
17
18
19
20
21
22
23
24
25
26
27
28
29
30
31
32
33
34
35
36
37
38
39
40
41
42
43
44
45
46
47
48
49
50
51
52
53
54
55
56
57
58
59
60
61
62
63
64
65
66
67
68
69
70
71
72
73
74
75
76
77
78
79
80
export function multicastChannel() {
let closed = false
// 这里taker分为的currentTakers、 nextTakers的原因和redux subscribe类似,防止在遍历taker时,taker发生变化。
let currentTakers = []
let nextTakers = currentTakers

const ensureCanMutateNextTakers = () => {
if (nextTakers !== currentTakers) {
return
}
nextTakers = currentTakers.slice()
}

const close = () => {
closed = true
const takers = (currentTakers = nextTakers)

for (let i = 0; i < takers.length; i++) {
const taker = takers[i]
taker(END)
}

nextTakers = []
}

return {
[MULTICAST]: true,
put(input) {

if (closed) {
return
}

if (isEnd(input)) {
close()
return
}

const takers = (currentTakers = nextTakers)
// 遍历takers,找到与input匹配的taker并执行它。
for (let i = 0; i < takers.length; i++) {
const taker = takers[i]
if (taker[MATCH](input)) {
taker.cancel()
taker(input)
}
}
},
// 存下callback,与配置函数
take(cb, matcher = matchers.wildcard) {
if (closed) {
cb(END)
return
}
cb[MATCH] = matcher
ensureCanMutateNextTakers()
nextTakers.push(cb)

cb.cancel = once(() => {
ensureCanMutateNextTakers()
remove(nextTakers, cb)
})
},
close,
}
}

export function stdChannel() {
const chan = multicastChannel()
const { put } = chan
chan.put = input => {
if (input[SAGA_ACTION]) {
put(input)
return
}
// 暂时不用管
asap(() => put(input))
}
return chan
}

createSagaMiddleware

获取redux-middleware, 同时初始化runsaga函数,为后面启动saga bind 所需的参数

1
2
3
4
5
6
7
8
9
10
11
12
13
14
15
16
17
18
19
20
21
22
23
24
25
26
27
28
29
30
31
32
33
34
35
36
37
38
39
40
41
42
43
44
export default function sagaMiddlewareFactory({ context = {}, ...options } = {}) {
const { sagaMonitor, logger, onError, effectMiddlewares } = options
let boundRunSaga

// redux middleware
function sagaMiddleware({ getState, dispatch }) {
// 新建一个channel
const channel = stdChannel()
channel.put = (options.emitter || identity)(channel.put)

boundRunSaga = runSaga.bind(null, {
context,
channel,
dispatch,
getState,
sagaMonitor,
logger,
onError,
effectMiddlewares,
})

return next => action => {
if (sagaMonitor && sagaMonitor.actionDispatched) {
sagaMonitor.actionDispatched(action)
}
const result = next(action) // hit reducers

// 将事件传递给saga
channel.put(action)
return result
}
}

// 启动saga
sagaMiddleware.run = (...args) => {
// ...

return boundRunSaga(...args)
}

//...

return sagaMiddleware
}

runsaga

1
2
3
4
5
6
7
8
9
10
11
12
13
14
15
16
17
18
19
20
21
22
23
24
25
26
27
28
29
30
31
32
33
34
35
36
37
38
39
40
41
42
43
44
45
46
47
48
49
50
51
52
53
54
55
56
57
58
export function runSaga(options, saga, ...args) {

// generate iterator
const iterator = saga(...args)

const {
channel = stdChannel(),
dispatch,
getState,
context = {},
sagaMonitor,
logger,
effectMiddlewares,
onError,
} = options

const effectId = nextSagaId()

// 一些错误检查
// ...

const log = logger || _log
const logError = err => {
log('error', err)
if (err && err.sagaStack) {
log('error', err.sagaStack)
}
}

const middleware = effectMiddlewares && compose(...effectMiddlewares)

// 可以先理解为 finalizeRunEffect = runEffect => runEffect
const finalizeRunEffect = runEffect => {
if (is.func(middleware)) {
return function finalRunEffect(effect, effectId, currCb) {
const plainRunEffect = eff => runEffect(eff, effectId, currCb)
return middleware(plainRunEffect)(effect)
}
} else {
return runEffect
}
}

const env = {
stdChannel: channel,
dispatch: wrapSagaDispatch(dispatch),
getState,
sagaMonitor,
logError,
onError,
finalizeRunEffect,
}

// 新建task,作用是控制 Generator 流程,类似与自动流程管理,这个后面会讲到
const task = proc(env, iterator, context, effectId, getMetaInfo(saga), null)

return task
}

redux-saga的核心就是task, 控制generator函数saga执行流程。是一个复杂的自动流程管理,我们先看一个简单的自动流程管理

1
2
3
4
5
6
7
8
9
10
11
12
13
14
15
16
17
18
19
20
21
22
23
// 一个返回promise的delay函数
const delay = (ms) => {
return new Promise((res) => {
setTimeout(res, ms);
});
}

function *main() {
yield delay(1000);
console.log('1s later');
yield delay(2000);
console.log('done');
}

// 为了达到想要的执行结果,我们必须在promise resolved之后再执行next statement,比如这样
const gen = main();
const r1 = gen.next();
r1.value.then(() => {
const r2 = gen.next();
r2.value.then(() => {
gen.next();
})
})

使用递归实现,自动流程控制

1
2
3
4
5
6
7
8
9
10
11
12
function autoRun(gfunc) {
const gen = gfunc();

function next() {
const res = gen.next();
if (res.done) return;
res.value.then(next);
}

next();
}
autoRun(main);

上面的自动流程控制函数仅仅支持 promise。

proc

1
2
3
4
5
6
7
8
9
10
11
12
13
14
15
16
17
18
19
20
21
22
23
24
25
26
27
28
29
30
31
32
33
34
35
36
37
38
39
40
41
42
43
44
45
46
47
48
49
50
51
52
53
54
55
56
57
58
59
60
61
62
63
64
65
66
67
68
69
70
71
72
73
74
75
76
77
78
79
80
81
82
83
84
85
86
87
88
89
90
91
92
93
94
95
96
97
98
99
100
101
102
103
104
105
106
107
108
109
110
111
112
113
114
115
116
117
118
119
120
121
122
123
124
125
126
127
128
129
130
131
132
133
134
135
136
137
138
139
140
141
142
143
144
145
146
147
148
149
150
151
152
153
154
155
156
157
export default function proc(env, iterator, parentContext, parentEffectId, meta, cont) {
// ...

const task = newTask(parentEffectId, meta, cont)
const mainTask = { meta, cancel: cancelMain, _isRunning: true, _isCancelled: false }

// 构建 task tree
const taskQueue = forkQueue(
mainTask,
function onAbort() {
cancelledDueToErrorTasks.push(...taskQueue.getTaskNames())
},
end,
)

next()

// then return the task descriptor to the caller
return task

function next(arg, isErr) {
let result
if (isErr) {
result = iterator.throw(arg)
} else if (shouldCancel(arg)) {
// ...
} else if (shouldTerminate(arg)) {
// ...
} else {
result = iterator.next(arg)
}

if (!result.done) {
// 如果没结束, 执行相应 effect
digestEffect(result.value, parentEffectId, '', next)
} else {
/**
This Generator has ended, terminate the main task and notify the fork queue
**/
mainTask._isRunning = false
mainTask.cont(result.value)
}
}

function digestEffect(effect, parentEffectId, label = '', cb) {
// 封装了cb函数 增加了事件钩子
function currCb(res, isErr) {
if (effectSettled) {
return
}

effectSettled = true
cb.cancel = noop // defensive measure
if (env.sagaMonitor) {
if (isErr) {
env.sagaMonitor.effectRejected(effectId, res)
} else {
env.sagaMonitor.effectResolved(effectId, res)
}
}
if (isErr) {
crashedEffect = effect
}
cb(res, isErr)
}

runEffect(effect, effectId, currCb)
}

// 每个 effect 的执行函数 这里先看一下常用的几个effect
function runEffect(effect, effectId, currCb) {
if (is.promise(effect)) {
resolvePromise(effect, currCb)
} else if (is.iterator(effect)) {
resolveIterator(effect, effectId, meta, currCb)
} else if (effect && effect[IO]) {
const { type, payload } = effect
if (type === effectTypes.TAKE) runTakeEffect(payload, currCb)
else if (type === effectTypes.PUT) runPutEffect(payload, currCb)
else if (type === effectTypes.CALL) runCallEffect(payload, effectId, currCb)
// 其他所有的effect ...
else currCb(effect)
} else {
// anything else returned as is
currCb(effect)
}
}

// 当返回值是 promise 时,就和之前实现的自动进程控制函数一样嘛
function resolvePromise(promise, cb) {
// ...
promise.then(cb, error => cb(error, true))
}

// 当是generator函数时
function resolveIterator(iterator, effectId, meta, cb) {
proc(env, iterator, taskContext, effectId, meta, cb)
}

// 当是 take 就把callback放在channel里,如果有匹配事件发生,触发 callback
function runTakeEffect({ channel = env.stdChannel, pattern, maybe }, cb) {
const takeCb = input => {
if (input instanceof Error) {
cb(input, true)
return
}
if (isEnd(input) && !maybe) {
cb(TERMINATE)
return
}
cb(input)
}
try {
channel.take(takeCb, is.notUndef(pattern) ? matcher(pattern) : null)
} catch (err) {
cb(err, true)
return
}
cb.cancel = takeCb.cancel
}

function runPutEffect({ channel, action, resolve }, cb) {
asap(() => {
let result
try {
// 发送 action
result = (channel ? channel.put : env.dispatch)(action)
} catch (error) {
cb(error, true)
return
}

if (resolve && is.promise(result)) {
resolvePromise(result, cb)
} else {
cb(result)
}
})
// put 是不能取消的
}

function runCallEffect({ context, fn, args }, effectId, cb) {
let result

try {
result = fn.apply(context, args)
} catch (error) {
cb(error, true)
return
}
return is.promise(result)
? resolvePromise(result, cb)
: is.iterator(result)
? resolveIterator(result, effectId, getMetaInfo(fn), cb)
: cb(result)
}
}

总结

redux-saga 将异步操作抽象为 effect,利用 generator 函数,控制saga流程。
到目前为止,只是涉及了一些基本流程,下一篇会对本篇进行补充。

redux源码分析

发表于 2018-09-03 |

Redux is a predictable state container for JavaScript apps.
官网第一句就很全面的介绍了redux。一个可预测的状态管理工具。redux 是如何做到的呢?

  • 单一的数据源 (states)
  • states是只读且不可变化的 (每次改变返回新值)
  • 通过纯函数改变states (reducer, 无副作用, 相同的输入就有相同的输出)
  • 改变states方式具有可描述性且单一 (action)

数据流


这个大家都很熟悉了吧,就不再讲了

源码解读

createStore

func createStore(reducer, preloadedState, enhancer) -> ({ dispatch, subscribe, getState, replaceReducer,[$$observable]: observable })

1
2
3
4
5
6
7
8
9
10
11
12
13
14
15
16
17
18
19
20
21
22
23
24
25
26
27
28
29
30
31
32
33
34
35
36
37
38
39
40
41
42
43
44
45
46
47
48
49
50
51
52
53
54
55
56
57
58
59
60
61
62
63
64
65
66
67
68
69
70
71
72
73
74
75
76
77
78
export default function createStore(reducer, preloadedState, enhancer) {
// preloadedState 可以不传,确定真实的参数
if (typeof preloadedState === 'function' && typeof enhancer === 'undefined') {
enhancer = preloadedState
preloadedState = undefined
}

if (typeof enhancer !== 'undefined') {
return enhancer(createStore)(reducer, preloadedState)
}

let currentReducer = reducer
let currentState = preloadedState
let currentListeners = []
let nextListeners = currentListeners
let isDispatching = false

function ensureCanMutateNextListeners() {
if (nextListeners === currentListeners) {
nextListeners = currentListeners.slice()
}
}

function getState() {
return currentState
}

function subscribe(listener) {
let isSubscribed = true

ensureCanMutateNextListeners()
nextListeners.push(listener)

return function unsubscribe() {
isSubscribed = false

ensureCanMutateNextListeners()
const index = nextListeners.indexOf(listener)
nextListeners.splice(index, 1)
}
}

function dispatch(action) {
try {
isDispatching = true
currentState = currentReducer(currentState, action)
} finally {
isDispatching = false
}

const listeners = (currentListeners = nextListeners)
for (let i = 0; i < listeners.length; i++) {
const listener = listeners[i]
listener()
}

return action
}

function replaceReducer(nextReducer) {
currentReducer = nextReducer
dispatch({ type: ActionTypes.REPLACE })
}

function observable() {
//...
}

dispatch({ type: ActionTypes.INIT })

return {
dispatch,
subscribe,
getState,
replaceReducer,
[$$observable]: observable,
}
}

为了篇幅减少些,上面的代码我删掉了部分错误检查。其实都很好理解,就有一点需要注意一下,为什么要用两个变量(currentListeners,nextListeners)来储存listener。这是因为redux允许在subscirbe中执行unsubscribe。
例如:

1
2
3
4
5
6
7
8
9
const unsubscribe1 = store.subscribe(() => {
unsubscribe1()
})

const unsubscribe2 = store.subscribe(() => {
unsubscribe2()
})

dispatch(unknownAction);

如果不缓存dispatch的listener的话 那么在dispatch里循环listeners时就会有问题。
另外也可以发现,如果你绑定了多个subscribe函数,即使在第一个subscription里执行了所有的unSubscribe,subscription还是会全部执行一遍
另外 observable 是为了和其他一些observable库配合使用,当目前为止还没用过。

applyMiddleware

用法
1
2
3
4
5
6
7
8
9
10
11
12
13
14
15
16
17
18
19
20
21
const logger = ({ getState }) => next => action => {
console.log('will dispatch logger1', action)
const returnValue = next(action)
console.log('state after dispatch logger1', getState())
}

const logger2 = ({ getState }) => next => action => {
console.log('will dispatch logger2', action)
const returnValue = next(action)
console.log('state after dispatch logger2', getState())
}

const store = createStore(
todos,
preload,
applyMiddleware(logger1, logger2),
);
// will dispatch logger1
// will dispatch logger2
// state after dispatch logger2
// state after dispatch logger1
源码
1
2
3
4
5
6
7
8
9
10
11
12
13
14
15
16
17
18
19
20
21
22
23
24
25
26
27
28
29
30
31
32
33
34
35
36
37
38
39
40
41
42
43
44
export default function applyMiddleware(...middlewares) {
return createStore => (...args) => {
const store = createStore(...args)
let dispatch = () => {
throw new Error(
`Dispatching while constructing your middleware is not allowed. ` +
`Other middleware would not be applied to this dispatch.`
)
}

const middlewareAPI = {
getState: store.getState,
dispatch: (...args) => dispatch(...args)
}

// chainItem:next => action => {...}
const chain = middlewares.map(middleware => middleware(middlewareAPI))
dispatch = compose(...chain)(store.dispatch)

return {
...store,
dispatch
}
}
}

export default function compose(...funcs) {
if (funcs.length === 0) {
return arg => arg
}

if (funcs.length === 1) {
return funcs[0]
}

return funcs.reduce((a, b) => (...args) => a(b(...args)))
}

// compose(logger1, logger2) => (...arg) => logger1Next(logger2Next(...arg))
// 合成之后的dispatch就成了这个样子:
const dispatch = (action) => logger1Next(logger2Next(store.dispatch))(action);

// 假如还有logger3, 那么应该是这个样子
const dispatch = (action) => logger1Next(logger2Next(logger3Next(store.dispatch)))(action);

可以compose原因是middle模式统一:store => next => action => {}
在执行完 const chain = middlewares.map(middleware => middleware(middlewareAPI))之后
chainItem: next => action => {} 本质是 接收一个dispatch,再返回一个合成的dispatch

bindActionCreators

用法

bindActionCreators({ actionCreator1, actionCreator2, …}, dispatch) => ({ boundAction1, boundAction2, … })

源码
1
2
3
4
5
6
7
8
9
10
11
12
13
14
15
16
17
18
19
20
21
22
23
24
25
26
27
28
29
// 返回 boundAction
function bindActionCreator(actionCreator, dispatch) {
return function() {
return dispatch(actionCreator.apply(this, arguments))
}
}

export default function bindActionCreators(actionCreators, dispatch) {
// 仅仅传入一个actionCreator
if (typeof actionCreators === 'function') {
return bindActionCreator(actionCreators, dispatch)
}

if (typeof actionCreators !== 'object' || actionCreators === null) {
throw new Error()
}

// 传入一个对象时,绑定所有key,并返回一个对象
const keys = Object.keys(actionCreators)
const boundActionCreators = {}
for (let i = 0; i < keys.length; i++) {
const key = keys[i]
const actionCreator = actionCreators[key]
if (typeof actionCreator === 'function') {
boundActionCreators[key] = bindActionCreator(actionCreator, dispatch)
}
}
return boundActionCreators
}

combineReducers

由于redux仅有一个store,所以当项目复杂的时候,数据需要分类,这时就会用到此函数。作用是将多个分开的reducers合并。

原型:(reducer1,reducer2, reducer3,…) => combinedReducer

1
2
3
4
5
6
7
8
9
10
11
12
13
14
15
16
17
18
19
20
21
22
23
24
25
26
27
28
29
30
31
32
33
34
35
36
37
38
39
40
41
42
43
44
45
46
47
48
49
50
51
52
53
54
55
56
57
58
59
60
61
62
63
64
65
66
67
68
69
70
71
72
73
export default function combineReducers(reducers) {
const reducerKeys = Object.keys(reducers)
const finalReducers = {}
// 遍历检查 reducer 不应该为 undefined
for (let i = 0; i < reducerKeys.length; i++) {
const key = reducerKeys[i]

if (process.env.NODE_ENV !== 'production') {
if (typeof reducers[key] === 'undefined') {
warning(`No reducer provided for key "${key}"`)
}
}

if (typeof reducers[key] === 'function') {
finalReducers[key] = reducers[key]
}
}
const finalReducerKeys = Object.keys(finalReducers)

let unexpectedKeyCache
if (process.env.NODE_ENV !== 'production') {
unexpectedKeyCache = {}
}

let shapeAssertionError
try {
// 检查 reducer 必须设置初始值,不可以返回 undefined
assertReducerShape(finalReducers)
} catch (e) {
shapeAssertionError = e
}

// combinedReducer
return function combination(state = {}, action) {
if (shapeAssertionError) {
throw shapeAssertionError
}

if (process.env.NODE_ENV !== 'production') {
// 检查 state 是否合法,例如state必须是对象、state应该有相对应的reducer等
// 使用了combineRudcer之后,state就是对象了,原来的state都放在了相对应的key下面
// 例如:combineReducers({ todos: reducer1, todoType: reducer2 });
// store 变成了 { todos: todoState, todoType: todoTypeState };
const warningMessage = getUnexpectedStateShapeWarningMessage(
state,
finalReducers,
action,
unexpectedKeyCache
)
if (warningMessage) {
warning(warningMessage)
}
}

let hasChanged = false
const nextState = {}
// 将action分发给每个reducer, 如果该改变就返回新的。
// 否则返回旧值,类似于你在每个reduer中的做法。
for (let i = 0; i < finalReducerKeys.length; i++) {
const key = finalReducerKeys[i]
const reducer = finalReducers[key]
const previousStateForKey = state[key]
const nextStateForKey = reducer(previousStateForKey, action)
if (typeof nextStateForKey === 'undefined') {
const errorMessage = getUndefinedStateErrorMessage(key, action)
throw new Error(errorMessage)
}
nextState[key] = nextStateForKey
hasChanged = hasChanged || nextStateForKey !== previousStateForKey
}
return hasChanged ? nextState : state
}
}

总结

redux源码还是比较好理解的,记住reducer一定要保证是纯函数。这对于测试和与其他的库配合至关重要。例如 react-redux。
感兴趣的朋友可以看看我的react-redux源码分析

  • react-redux源码分析及实现原型
  • react-redux源码分析及实现原型(下)
    下周会给大家带来redux-saga这个中间件源码解读,感兴趣的请关注~

参考阅读

https://blog.gisspan.com/2017/02/Redux-Vs-MVC,-Why-and-How.html

react-redux源码分析及实现原型_下

发表于 2018-09-02 |

上一次我们讲解了Provider、connect、selectorFactory。这次主要分析 connectAdvanced 这个核心API。

connectAdvanced

在开始之前我们先来看一个工具函数

1
2
3
4
5
6
7
8
9
10
11
12
13
14
15
16
17
18
19
function makeSelectorStateful(sourceSelector, store) {
const selector = {
run: function runComponentSelector(props) {
try {
const nextProps = sourceSelector(store.getState(), props)
if (nextProps !== selector.props || selector.error) {
selector.shouldComponentUpdate = true
selector.props = nextProps
selector.error = null
}
} catch (error) {
selector.shouldComponentUpdate = true
selector.error = error
}
}
}

return selector
}

上篇讲过 selector 会将新的值和缓存的值做比较,如果变化,将重新求值并返回,如果没变化,返回缓存的旧值。makeSelectorStateful 函数是对 selector 的封装。正如其名字一样,使selector stateful

再介绍一下hoist-non-react-statics这个库,作用是避免在使用HOC时,导致类的static方法丢失的问题。详情见react doc

Subscription是实现react与redux绑定的类,在接下来会用到我们先来看一下

1
2
3
4
5
6
7
8
9
10
11
12
13
14
15
16
17
18
19
20
21
22
23
24
25
26
27
28
29
30
31
32
33
34
35
36
37
38
39
40
41
export default class Subscription {
constructor(store, parentSub, onStateChange) {
this.store = store
this.parentSub = parentSub
this.onStateChange = onStateChange
this.unsubscribe = null
this.listeners = nullListeners
}

addNestedSub(listener) {
this.trySubscribe()
return this.listeners.subscribe(listener)
}

notifyNestedSubs() {
this.listeners.notify()
}

isSubscribed() {
return Boolean(this.unsubscribe)
}

trySubscribe() {
if (!this.unsubscribe) {
this.unsubscribe = this.parentSub
? this.parentSub.addNestedSub(this.onStateChange)
: this.store.subscribe(this.onStateChange)

this.listeners = createListenerCollection()
}
}

tryUnsubscribe() {
if (this.unsubscribe) {
this.unsubscribe()
this.unsubscribe = null
this.listeners.clear()
this.listeners = nullListeners
}
}
}

重点在 trySubscribe 方法,如果 parentSub 存在就将回调函数绑定在父组件上,否则绑定在store.subscribe中
原因是这样可以保证组件的更新顺序,从父到子。

然后可以开始 connectAdvanced

1
2
3
4
5
6
7
8
9
10
11
12
13
14
15
16
17
18
19
20
21
22
23
24
25
26
27
28
29
30
31
32
33
34
35
36
37
38
39
40
41
42
43
44
45
46
47
48
49
50
51
52
53
54
55
56
57
58
59
60
61
62
63
64
65
66
67
68
69
70
71
72
73
74
75
76
77
78
79
80
81
82
83
84
85
86
87
88
89
90
91
92
93
94
95
96
97
98
99
100
101
102
103
104
105
106
107
108
109
110
111
112
113
114
115
116
117
118
119
120
121
122
123
124
125
126
127
128
129
130
131
132
133
134
135
136
137
138
139
140
141
export default function connectAdvanced(
selectorFactory,
{
shouldHandleStateChanges = true,
storeKey = 'store',
// 传递给 selectorFactory 的参数
...connectOptions
} = {}
) {
return function wrapWithConnect(WrappedComponent) {

//...

const selectorFactoryOptions = {
...connectOptions,
shouldHandleStateChanges,
// ...
}

class Connect extends Component {
constructor(props, context) {
super(props, context)

this.version = version
this.state = {}
this.renderCount = 0
this.store = props[storeKey] || context[storeKey]
this.propsMode = Boolean(props[storeKey])
this.setWrappedInstance = this.setWrappedInstance.bind(this)、

// selector 与 subscription 的初始化
this.initSelector()
this.initSubscription()
}

getChildContext() {
// 如果组件从props里获得store,那么将 context 中的 subscription 传递下去
// 否则就将传递此组件中的 subscription
// 子组件使用祖先组件的 subscription 可以保证组件的更新顺序(父 -> 子)。
// 另外 将store通过props传递下去,这种场景是什么。。。
const subscription = this.propsMode ? null : this.subscription
return { [subscriptionKey]: subscription || this.context[subscriptionKey] }
}

componentDidMount() {
// shouldHandleStateChanges === Boolean(mapStateToProps)
// 如果没有 mapStateToProps 组件不需要监听store变化
if (!shouldHandleStateChanges) return

// 由于 componentWillMount 会在ssr中触发,而 componentDidMount、componentWillUnmount不会。
// 如果将subscription放在 componentWillMount中,那么 unsubscription 将不会被触发,将会导致内存泄漏。
this.subscription.trySubscribe()

// 为了防止子组件在 componentWillMount 中调用dipatch 所以这里需要在重新计算一次
// 因为子组件的 componentWillMount 先于组件的 componentDidMount 发生,此时还没有执行 trySubscribe
this.selector.run(this.props)
if (this.selector.shouldComponentUpdate) this.forceUpdate()
}

componentWillReceiveProps(nextProps) {
this.selector.run(nextProps)
}

shouldComponentUpdate() {
return this.selector.shouldComponentUpdate
}

componentWillUnmount() {
if (this.subscription) this.subscription.tryUnsubscribe()
this.subscription = null
this.notifyNestedSubs = noop
this.store = null
this.selector.run = noop
this.selector.shouldComponentUpdate = false
}

initSelector() {
const sourceSelector = selectorFactory(this.store.dispatch, selectorFactoryOptions)
this.selector = makeSelectorStateful(sourceSelector, this.store)
this.selector.run(this.props)
}

initSubscription() {
if (!shouldHandleStateChanges) return

const parentSub = (this.propsMode ? this.props : this.context)[subscriptionKey]
this.subscription = new Subscription(this.store, parentSub, this.onStateChange.bind(this))

// 这里是防止组件在通知过程中卸载,此时this.subscription就为null了。这里将notifyNestedSubs拷贝一次。
// 并且在componentWillUnmount 中 this.notifyNestedSubs = noop,
this.notifyNestedSubs = this.subscription.notifyNestedSubs.bind(this.subscription)
}

onStateChange() {
this.selector.run(this.props)

if (!this.selector.shouldComponentUpdate) {
// 如果不需要更新则通知子组件
this.notifyNestedSubs()
} else {
// 如果需要更新则在更新之后,再通知子组件
this.componentDidUpdate = this.notifyNestedSubsOnComponentDidUpdate

// 组件更新
this.setState(dummyState)
}
}

notifyNestedSubsOnComponentDidUpdate() {
// 避免重复通知
this.componentDidUpdate = undefined
this.notifyNestedSubs()
}

isSubscribed() {
return Boolean(this.subscription) && this.subscription.isSubscribed()
}

render() {
const selector = this.selector
selector.shouldComponentUpdate = false

if (selector.error) {
throw selector.error
} else {
return createElement(WrappedComponent, this.addExtraProps(selector.props))
}
}
}

/* eslint-enable react/no-deprecated */

Connect.WrappedComponent = WrappedComponent
Connect.displayName = displayName
Connect.childContextTypes = childContextTypes
Connect.contextTypes = contextTypes
Connect.propTypes = contextTypes

return hoistStatics(Connect, WrappedComponent)
}
}

over~ 是不是觉得react-redux很简单?
接下来我会将react技术栈中常用的库(react, react-router, redux, redux-saga, dva)源码分析一遍,喜欢的话。可以watch me!

react-redux源码分析及实现原型

发表于 2018-09-01 |

redux作为大型应用的状态管理工具,如果想配合react使用,需要借助react-redux。
redux主要完成两件事情:

  • 负责应用的状态管理,保证单向数据流
  • 当应用状态发生变化,触发监听器。

那么,如果想要将react和redux搭配使用,就需要react组件可以根据redux中所存储的状态(store)更新view。
并且可以改变store。其实react-redux主要就是完成了这两件事情。
第一,通过将store传入root组件的context,使子节点可以获取到 state。
第二,通过store.subscribe 订阅store的变化,更新组件。
另外还有对于性能的优化,减少不必要的渲染。

熟悉使用方法

首先我们熟悉一下react-redux的基本使用

1
2
3
4
5
6
7
8
9
10
11
12
13
14
15
16
17
18
19
20
21
22
23
24
25
26
27
28
29
30
31
32
33
34
35
36
37
38
39
40
41
42
43
44
45
46
47
48
49
50
51
52
53
54
55
56
57
58
59
60
import React from 'react';
import ReactDOM from 'react-dom';
import PropTypes from 'prop-types';
import { createStore } from 'redux';
import { Provider, connect } from 'react-redux';

const reducer = (state, action) => {
if (action.type === 'add') {
return {
...state,
count: state.count + 1,
}
}
return state;
};

const store = createStore(reducer, { count: 1 });

const mapStateToProps = (state) => {
return ({
count: state.count,
});
};

const mapDispatchToProps = dispatch => ({
add: () => dispatch({ type: 'add' }),
});

const mergeProps = (state, props) =>({
countStr: `计数: ${state.count}`,
...props,
});

const options = {
pure: true,
};

class App extends React.Component {
render() {
return (
<div>
<p>{this.props.countStr}</p>
<button onClick={this.props.add}>点击+1</button>
</div>
)
}
}

const AppContainer = connect(
mapStateToProps,
mapDispatchToProps,
mergeProps,
options,
)(App);

ReactDOM.render(
<Provider store={store}>
<AppContainer a={123} />
</Provider>,
document.getElementById('root'));

从上面的例子中我们可以看出,react-redux使用非常简单,仅仅使用了两个API,Provider 与 connect。

  • Provider: 接收从redux而来的store,以供子组件使用。
  • connect: 高阶组件,当组件需要获取或者想要改变store的时候使用。可以接受四个参数:
    • mapStateToProps:取store数据,传递给组件。
    • mapDispatchToProps:改变store数据。
    • mergeProps:可以在其中对 mapStateToProps, mapDispatchToProps的结果进一步处理
    • options:一些配置项,例如 pure.当设置为true时,会避免不必要的渲染

源码解读

Provider

1
2
3
4
5
6
7
8
9
10
11
12
13
14
class Provider extends Component {
getChildContext() {
return { [storeKey]: this[storeKey], [subscriptionKey]: null }
}

constructor(props, context) {
super(props, context)
this[storeKey] = props.store;
}

render() {
return Children.only(this.props.children)
}
}

够简单吧,仅仅是把store放在了context下。subscriptionKey 可以暂时不用管。

connect

首先我们先回忆一下connect使用方法:

1
connect(mapStateToProps,mapDispatchToProps,mergeProps,options)(App);

connect源码:

1
2
3
4
5
6
7
8
9
10
11
12
13
14
15
16
17
18
19
20
21
22
23
24
25
26
27
28
29
30
31
32
33
34
35
36
37
38
39
export function createConnect({
connectHOC = connectAdvanced,
mapStateToPropsFactories = defaultMapStateToPropsFactories,
mapDispatchToPropsFactories = defaultMapDispatchToPropsFactories,
mergePropsFactories = defaultMergePropsFactories,
selectorFactory = defaultSelectorFactory
} = {}) {
return function connect(
mapStateToProps,
mapDispatchToProps,
mergeProps,
{
pure = true,
// ...
} = {}
) {
// 封装了传入的mapStateToProps等函数,这里可以先理解为 initMapStateToProps = () => mapStateToProps 这种形式
const initMapStateToProps = match(mapStateToProps, mapStateToPropsFactories, 'mapStateToProps')
const initMapDispatchToProps = match(mapDispatchToProps, mapDispatchToPropsFactories, 'mapDispatchToProps')
const initMergeProps = match(mergeProps, mergePropsFactories, 'mergeProps')

// 选择器(selector)的作用就是计算mapStateToProps,mapDispatchToProps, ownProps(来自父组件的props)的结果,
// 并将结果传给子组件props。这就是为什么你在mapStateToProps等三个函数中写的结果,子组件可以通过this.props拿到。
// 选择器工厂函数(selectorFactory)作用就是创建selector
return connectHOC(selectorFactory, {
// 如果没有传,那么将不会监听state变化
shouldHandleStateChanges: Boolean(mapStateToProps),

// 传给selectorFactory的参数
initMapStateToProps,
initMapDispatchToProps,
initMergeProps,
pure,
// ...
})
}
}

export default createConnect()

这段我们可以知道,connect是对connectHOC(connectAdvanced)的封装,connectAdvanced使用了 defaultSelectorFactory,来创建selector。
react-redux 默认的 selectorFactory 中包含了很多性能优化的部分(我们一会儿会看到)。
其实react-redux 也提供了connectAdvanced API,为了便于大家理解我通过改变开头的例子,了解一下selectorFactory 是如何工作的。

1
2
3
4
5
6
7
8
9
10
11
12
13
14
15
16
17
18
19
20
21
// const AppContainer = connect(
// mapStateToProps,
// mapDispatchToProps,
// mergeProps,
// options,
// )(App);

// 在之前我们使用了connect,现在我们使用 connectAdvanced 来实现一下。
// 主要是是实现 selectorFactory:
function selectorFactory(dispatch) {
let result = {}
const action = mapDispatchToProps(dispatch);

return (nextState, nextOwnProps) => {
const state = mapStateToProps(nextState);
const nextResult = mergeProps(state, action, nextOwnProps);
if (!shallowEqual(result, nextResult)) result = nextResult
return result;
}
}
const AppContainer = connectAdvanced(selectorFactory)(App);

这是一个简单的 selectorFactory,主要体现了其是如何工作的,让大家有一个大概的了解。
下面来看一下react-redux是如何实现 selectorFactory 的

selectorFactory

在解读代码之前,我想先说一下options.pure的作用。不知道大家还记得吗,在开头的例子有一个配置项pure。作用是减少运算优化性能。当设置为false时,react-redux将不会优化,store.subscirbe事件触发,组件就会渲染,即使是没有用到的state更新,也会这样,举个例子

1
2
3
4
5
6
7
8
9
10
11
12
13
// 大家都知道reducer的写法
return {
...state,
count: state.count + 1,
}

// 必须返回一个新对象,那么如果我只是修改原来 state 比如
state.count += 1;
return state;

// 你会发现组件将不会渲染,其实store里的值是发生变化的。
// 这时如果你非想这么写, 然后又想重新渲染怎么办?
// 就是将pure设置为false,这样组件就会完全实时更新。

举了个不恰当的例子,大家千万不要这么干。。。

源码:

1
2
3
4
5
6
7
8
9
10
11
12
13
14
15
16
17
18
19
20
21
22
23
24
25
26
export default function finalPropsSelectorFactory(dispatch, {
initMapStateToProps,
initMapDispatchToProps,
initMergeProps,
...options
}) {
const mapStateToProps = initMapStateToProps(dispatch, options)
const mapDispatchToProps = initMapDispatchToProps(dispatch, options)
const mergeProps = initMergeProps(dispatch, options)

if (process.env.NODE_ENV !== 'production') {
verifySubselectors(mapStateToProps, mapDispatchToProps, mergeProps, options.displayName)
}

const selectorFactory = options.pure
? pureFinalPropsSelectorFactory
: impureFinalPropsSelectorFactory

return selectorFactory(
mapStateToProps,
mapDispatchToProps,
mergeProps,
dispatch,
options
)
}

这里很好理解,是对 selectorFactory 的封装,根据 options.pure 的值,选取不同的 SelectorFactory;

  • options.pure 为 false 时,使用 impureFinalPropsSelectorFactory
  • options.pure 为 true 时,使用 pureFinalPropsSelectorFactory

先来看看简单的 impureFinalPropsSelectorFactory,其实和之前实现的 selectorFactory,差不多,无脑计算返回新值。

1
2
3
4
5
6
7
8
9
10
11
12
13
14
export function impureFinalPropsSelectorFactory(
mapStateToProps,
mapDispatchToProps,
mergeProps,
dispatch
) {
return function impureFinalPropsSelector(state, ownProps) {
return mergeProps(
mapStateToProps(state, ownProps),
mapDispatchToProps(dispatch, ownProps),
ownProps
)
}
}

怎么样,和之前自己实现的差不多吧,自己实现的还有一个浅对比呢~ 笑哭

pureFinalPropsSelectorFactory

1
2
3
4
5
6
7
8
9
10
11
12
13
14
15
16
17
18
19
20
21
22
23
24
25
26
27
28
29
30
31
32
33
34
35
36
37
38
39
40
41
42
43
44
45
46
47
48
49
50
51
52
53
54
55
56
57
58
59
60
export function pureFinalPropsSelectorFactory(
mapStateToProps,
mapDispatchToProps,
mergeProps,
dispatch,
{ areStatesEqual, areOwnPropsEqual, areStatePropsEqual }
) {
let hasRunAtLeastOnce = false
let state
let ownProps
let stateProps
let dispatchProps
let mergedProps

function handleFirstCall(firstState, firstOwnProps) {
state = firstState
ownProps = firstOwnProps
stateProps = mapStateToProps(state, ownProps)
dispatchProps = mapDispatchToProps(dispatch, ownProps)
mergedProps = mergeProps(stateProps, dispatchProps, ownProps)
hasRunAtLeastOnce = true
return mergedProps
}

function handleNewPropsAndNewState() {
stateProps = mapStateToProps(state, ownProps)

if (mapDispatchToProps.dependsOnOwnProps)
dispatchProps = mapDispatchToProps(dispatch, ownProps)

mergedProps = mergeProps(stateProps, dispatchProps, ownProps)
return mergedProps
}

function handleNewProps() {
// ...
}

function handleNewState() {
// ...
}

function handleSubsequentCalls(nextState, nextOwnProps) {
const propsChanged = !areOwnPropsEqual(nextOwnProps, ownProps)
const stateChanged = !areStatesEqual(nextState, state)
state = nextState
ownProps = nextOwnProps

if (propsChanged && stateChanged) return handleNewPropsAndNewState()
if (propsChanged) return handleNewProps()
if (stateChanged) return handleNewState()
return mergedProps
}

return function pureFinalPropsSelector(nextState, nextOwnProps) {
return hasRunAtLeastOnce
? handleSubsequentCalls(nextState, nextOwnProps)
: handleFirstCall(nextState, nextOwnProps)
}
}

一句话: 在需要的时候才执行mapStateToProps,mapDispatchToProps,mergeProps
为了减少篇幅,挑部分讲解。其实这篇已经很长了有没有,不知道看到这里的你,犯困了没有?
还是已经睡着了? 上个图醒醒脑
Anne Hathaway

言归正传,这里也分两种情况:

  • 当第一次运行时,执行handleFirstCall,将三个map函数运行一遍,并将结果缓存下来
  • 之后运行 handleSubsequentCalls,在其中将新的值和缓存的值做比较,如果变化,将重新求值并返回,如果没变化,返回缓存的旧值。

其中 mapFunction.dependsOnOwnProps 代表你传入的mapStateToProps是否使用了ownProps。
如果没有使用,那么props的变化将不会影响结果,换句话说对应的mapFunction将不会执行。
判断方法也很简单,就是获取function形参长度,如何获得呢? mdn function.length

总结

这边文章主要讲了react-redux使用方法以及分析了源码中 Provider、connect、selectorFactory。中间也穿插了一些demo方便大家理解。
到目前为止大家应该已经熟悉了整个框架的工作流程。由于感觉篇幅过长,所以决定分为两期来讲解。下面一期中主要是剩下的 connectHOC(connectAdvanced),这个才是react-redux的核心。
希望看完的朋友没有浪费你们时间,有所帮助,有什么意见尽管提,就当你们自己是产品(🐶)好le.
写完又读了一遍,感觉篇幅其实不长,想想应该是自己写的累了。。。

123
山石岩

山石岩

大前端

21 日志
6 标签
© 2021 山石岩
由 Hexo 强力驱动
主题 - NexT.Muse