前路漫漫 唯风作伴

脚踏大地 仰望星空


  • 首页

  • 归档

  • 标签

光栅图形学-扫描转换算法

发表于 2021-05-09 |

本文介绍了直线段、圆弧、多边形扫描转换算法。使用 Javascript 实现多边形扫描算法。

直线段的的扫描转换算法

记得在上大学的时候,刚开始学单片机。老爸让我在液晶屏上实现画出一次方程直线的功能,当时捣鼓了一上午才搞定一条歪歪扭扭的线。这几年时间过去,又在看如何画直线,果然是轮回。
主要有三种方式 数值微分(DDA)法、中点画线法、布雷森汉姆(Bresenham)算法

DDA算法

求出直线斜率 k。当 |k| <= 1 时,x每递增1时,y递增k。当 |k| > 1 时,y 每增加1,x 增加 1 / k。这样才能保证点是连续的。
在这个算法中,y 和 k 必须用浮点数表示,而且每一步都要对 y 进行四舍五入取整,效率不高。因为是对每个像素进行处理,所以在图形学中效率非常重要,后面也会有对浮点数以及乘除的优化。
当 |k| <= 1 时,伪代码如下

1
2
3
4
5
6
7
8
9
10
11
12
13
14
void DDALine(int x0, int y0, int x1, int y1, int color)
{
int x;
float dx, dy, y, k,
dx = x1 - x0,
dy = y1 - y0,
k = dy / dx,
y = y0;

for (x = x0; x <= x1; x++) {
drawpixel(x, int(y + 0.5), color);
y = y + k;
}
}

中点画线法

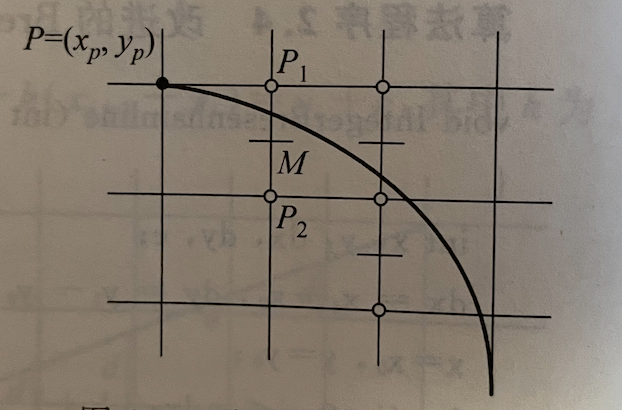
通过观察下图可以看到,假如当前点为 P,则下一个像素点有两种情况,P1和P2。
M点为P1,P2中点,Q点为理想直线上的点。当 M 在 Q 下方,P2 应为下一个像素点,当 M 在 Q 上方,P1 应为下一个像素点。所以可以通过比较F(Mx, My) 和 0 的大小,可以确定下个像素点位置。

d = F(M) = F(Px + 1, Py + 0.5) = a(Px + 1) + b(Py + 0.5) + c;

mid

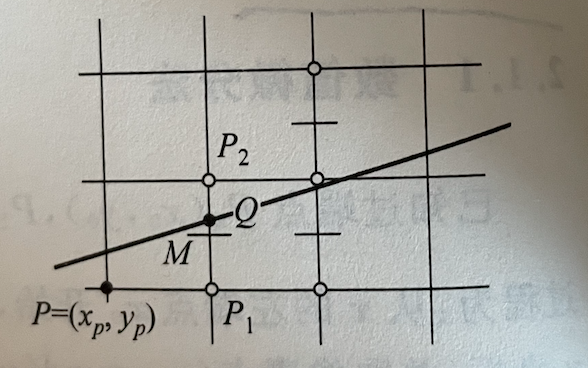
对于过 (x0, y0)(x1, y1) 两点的直线L来说,采用方程 F(x, y) = ax+ by + c = 0表示。其中 a = y0 - y1, b = x1 - x0, c = x0y1 - x1y0;

利用此方程可以画出直线,但是这种方式需要进行 4 个加法和两个乘法。事实上,d 是 Px, Py的线性函数,所以可以使用增量计算的方法优化。
若 d >= 0,则取正右方像素 P1,那么判断下一个像素位置就是d1 = F(Px + 2, Py + 0.5) = d + a;,增量为 a.
若 d < 0,则取右上方像素P2,那么判断下一个像素位置就是 d1 = F(Px + 2, Py + 1.5) = d + a + b;增量为 a + b
设从点(x0, y0)开始画线,d的初值为d0 = F(x0 + 1, y0 + 0.5) = F(x0, y0) + a + 0.5b = a + 0.5b
由于使用的只是 d 的符号,而 d 的增量都是整数,只有初始值包含小数,所以用 2d 代替 d 来摆脱浮点运算。优化过后的伪代码如下:

1
2
3
4
5
6
7
8
9
10
11
12
13
14
15
16
void Midpoint Line(int x0, int y0, int x1, int y1, int color)
{
int a, b, d1, d2, d, x, y;
a = y0 - y1, b = x1 - x0, d = 2 * a + b;
d1 = 2 * a, d2 = 2 * (a + b);
x = x0, y = y0;
drawpixel(x, y, color;
while(x < x1)
{
if (d < 0)
{ x++, y++, d += d2;}
else
{x++, d += d1;}
drawpixel(x, y, color);
}
}

Bresenham

类似于中点画线法,通过偏移量d与0.5的比较来确定像素点所在的位置,其中d1 = d0 + k;

bresenham

圆弧的的扫描转换算法

圆有四条对称轴,所以已知圆弧上一点(x, y),可以得到其关于4条对称轴的其他 7 个点,这种性质被称为八对称性。因此,只要扫描转换 1/8 圆弧,就可以用八对称性求出整个圆的像素集.具体算法也是类似于中点画线法,只不过函数方程变为圆。

circle

多边形的的扫描转换算法

在计算机图形学中,多边形有顶点和点阵两种表现方式。
顶点表示直观,几何意义强,占内存少,易于进行几何变换。但不利于着色。
点阵表示丢失了许多几何信息,但便于帧缓冲器表示图形。光栅图形学的本质问题是把多边形的顶点表示转换为点阵表示,这种转换被称为多边形的扫描转换。其中有两种方法,扫描线算法和边界标志算法,下方会用 javascript 在 canvas 中实现扫描线算法。

扫描线算法

通过计算扫描线与多边形的相交区间,再用要求的颜色显示这区间的像素,以完成填充工作。区间的端点通过计算扫描线与多边形的边界线交点获得。
对于一条扫描线,主要分为下面四个步骤:

  1. 求交。计算扫描线与多边形各边的交点
  2. 排序。把所有交点按 x 值的递增顺序排序
  3. 配对。将1和2,3和4等等配对
  4. 填色。相交区间内的像素置为多边形的颜色

circle

由于反复求交运算效率低下,为了优化这个问题,将引入两个概念AET和NET。
将与当前扫描线相交的边称为活性边(AET)。如果某边的较低端点为ymin,则改边就放在扫描线 ymin 的新边表(NET)中。边在 AET 和 NET 中存储使用单链表的形式。每个节点包含三个信息,1、存当前扫描线与边的交点坐标x值,2、从当前扫描线到下一条扫描线间x的增量 dx;3、存该边所交的最高扫描线号ymax。
有了NET之后,就可以通过 NET 来维护 AET,如果当前扫描线在 NET中 有值时,就加入到 AET中,每次扫描线加一,就在原来x的基础上增加dx。当扫描线号大于 ymax时,将其从AET中删除。伪代码如下

1
2
3
4
5
6
7
8
9
10
11
12
13
14
15
16
17
void polyfill(polygon, color)
int color
多边形 polygon
{
for (各条扫描线 i) {
初始化新边表头指针 NET[i]
把 ymin = i 的边放进 NET[i]
}
y = 最低扫描线号
初始化活性边表为空
for (各条扫描线i) {
把 NET[i] 中的边结点用插入排序法插入 AET, 使之按 x 坐标递增顺序排列
若允许多边形的边自相交,则用冒泡排序法对 AET 重新排序
遍历 AET, 把配对交点区间(左闭右开)上的像素(x,y),用 drawpixel(x, y, color) 改写像素颜色值
遍历 AET,把 ymax = i 的结点从 AET 中删除,并把 ymax > i 结点的 x 值递增 dx;
}
}

使用 javascript 实现此算法:

1
2
3
4
5
6
7
8
9
10
11
12
13
14
15
16
17
18
19
20
21
22
23
24
25
26
27
28
29
30
31
32
33
34
35
36
37
38
39
40
41
42
43
44
45
46
47
48
49
50
51
52
53
54
55
56
57
58
59
60
61
62
63
64
65
66
67
68
69
70
71
72
73
74
75
76
77
78
79
80
81
82
83
84
85
86
87
88
89
90
91
92
93
94
95
96
97
98
99
100
101
102
103
104
105
106
107
108
109
110
111
112
113
114
115
116
117
118
119
120
121
<!DOCTYPE html>
<html lang="en">
<head>
<meta charset="UTF-8">
<meta name="viewport" content="width=device-width, initial-scale=1.0">
<title>Document</title>
</head>
<body>
<canvas width="400" height="400"></canvas>
<script>
const WIDTH = 400;
const HEIGHT = 400;
// 输入三角形中的三个顶点
const POINTS = [[200, 50], [150, 300], [300, 350]];


const AET = []; // 活性边
const NET = {}; // 新边表,这里为了方便使用数组

const ctx = document.body.querySelector('canvas').getContext('2d');
// 将 canvas 中的坐标系与笛卡尔坐标系保持一致,方便绘制
ctx.translate(0, HEIGHT);
ctx.scale(1, -1);

POINTS.forEach(p => {
drawPixel(p[0], p[1], '#F00', 3);
})

// 初始化 NET
// 如果某边的较低端点为ymin,则该边就放在扫描线ymin的新边表中。
for (let i = 0; i < POINTS.length; i++) {

// 由 point 和 next_point 组成的边
const point = POINTS[i];

const j = i === POINTS.length - 1 ? 0 : i + 1;
const next_point = POINTS[j];

const minY_point = point[1] <= next_point[1] ? point : next_point;
const maxY_point = point[1] <= next_point[1] ? next_point : point;

const newNode = {
x: minY_point[0],
// TODO: 没有考虑水平的情况
dx: (maxY_point[0] - minY_point[0]) / (maxY_point[1] - minY_point[1]),
ymax: maxY_point[1],
next: null,
points: [i, j],
}

const ymin = minY_point[1];

// 将点存在新边表中,如果新边表中已经存在值则放在链表尾部
if (NET[ymin]) {
let current = NET[ymin];
while (current.next) {
current = current.next;
}
current.next = newNode;
} else {
NET[ymin] = newNode;
}
}
console.log('NET', NET);

// 遍历所有扫描边,绘制图形
for (let i = 0; i < HEIGHT; i++) {
// 假如新边表有值,将节点插入 AET 中
if (NET[i]) {
let current = NET[i];
while (current) {
// NET 插入排序法 进 AET
let j = 0
for (; j < AET.length; j++) {
if (AET[j].x > current.x) {
break;
}
}
AET.splice(j, 0, current);

current = current.next;
}
}

// 遍历 AET 表,如果扫描边等于节点 ymax 值,
// 则说明已经超出此线段范围,从 AET 中删除。
// 否则,x 值递增 dx
for (let j = 0; j < AET.length; j++) {
const node = AET[j];
if (node.ymax === i) {
// 删除此节点
AET.splice(j, 1);
j--;
} else if (node.ymax >= i) {
node.x = node.x + node.dx
}
}

// 将 AET 中的节点,两两配对,绘制两点之间的线段
for (let j = 0; j < AET.length; j += 2) {
if (AET[j] && AET[j + 1]) {
drawPixels(AET[j].x, AET[j + 1].x, i);
}
}
}

console.log('AET', AET);

function drawPixels(x1, x2, y) {
for (let i = x1; i < x2; i++) {
drawPixel(i, y);
}
}

function drawPixel(x, y, color = '#000', size = 1) {
ctx.fillStyle = color;
ctx.fillRect(Math.round(x), Math.round(y), size, size);
}
</script>
</body>
</html>

结果如下:

circle

Chrome 浏览器原理

发表于 2021-04-15 |

Part 1 浏览器架构

CPU, GPU, Memory, 多进程架构, 通过 IPC(Inter Process Communication)通信。包含的几个进程及内容:

  • Browser process: 地址栏,书签,前进,后退,网络请求和文件
  • Render process: 控制所有 tab 中显示的内容
  • Plugin: 例如 flash
  • GPU: 处理 GPU 任务

通过 Chrome 右上角-更多工具-任务管理器, 可以查看进程, 一般情况下,每个 Tab 页都是一个 render process,使得页面之间互不影响,并且更加安全。如果多个tab页,但网站之间是同域的,还是会共享一个 render process。

Site Isolation 技术实现了即使是跨域的 iframe,也会使用不同的 render process。这意味着一个 Tab 页,可能对应多个 render process。此技术是里程碑式的,没有想象的这么简单,比如 Ctrl + F 必须在多个Render process中搜索。

Part 2 在导航期间发生了什么

导航从 Browser process开始,Browser process 中包含了 UI thread(绘制按钮和搜索框)、Network thread(请求数据)、Storage thread(文件)。

  • (处理输入)当用户在地址栏输入文字时,UI thread 会解析字符串,判断是搜索文字还是URL地址。
  • (开始导航)当用户点击 Enter 按键,UI thread 会初始化网络请求获取内容。Network thread 会进行 DNS查询、建立 TLS连接。
  • (读响应数据)当获取到 Response body时,Network thread 会通过 Content-Type 选择合适的处理方式。如果请求是HTML file,会将数据传递给 Renderer process,如果是 zip 或者其他下载文件,会传递给下载管理器。
  • (找到 renderer process)如果请求返回数据通过了安全检查,Network thread 会通知 UI thread,UI thread 会使用 Renderer process 渲染页面。
  • (提交 navigation)数据会通过IPC从 Browser process 发到 Renderer process。如果 navigation 已经完成,Renderer process 会通知 Browser [Page loaded], 地址栏旁边的spinner将会消失。提交导航后,Renderer process 将会继续加载资源和渲染页面,具体细节,会在后面说到。

Part 3 渲染器进程

渲染器进程处理tab页中所有的事情。main thread处理大部分代码,一些web worker 和 service worker相关的代码会交给 worker thread。compositor thread 和 raster thread 负责渲染页面更有效率和流畅。

renderer process 核心工作是将 HTML,CSS, JS 转变成可交互页面。

main thread 解析HTML文件为 DOM 结构,HTML解析器遇到 script 标签会停止解析,直到加载,解析,执行 js 代码完成之后。因为 js 可能会导致 DOM 结构改变。

得到DOM之后,main thread 解析 CSS 得到每个 DOM Node 的 computed style。

得到 computed style 之后,准备生成 layout tree,获取元素的几何结构,例如元素 x,y坐标,盒尺寸等。

然后是 paint 步骤,决定绘制顺序,比如 z-index。结果是生成绘制指令不是真的绘制。main thread 会遍历 layout tree 生成 paint records(类似 “background first, then text, then rectangle”.)。

得到 paint 指令之后,将这些信息转变为屏幕上的像素被称为栅格化(rasterizing)。在 Chrome 早期的时候,初始化时栅格化 viewport 中的内容,当用户滚动之后,在对新内容进行栅格化。在后期版本中,又增加了一个 合成(compositing)步骤。

Compositing 会将页面分为不同的层,并且对每一层进行栅格化。当有滚动、动画发生时,仅通过合成来获得新的帧。为了判断元素应该被放在哪一层里,主线程会通过遍历 layout tree 去创建 layer tree(可以通过will-change生成新的layer)。

一旦 layer tree 和 paint order 准备就绪,主线程会将信息提交给 compositor thread。然后在栅格化每一层。layer 可能会是整个页面大小,所以 compositor thread 会把layer切分成瓦片(tile)。然后栅格进程对tile进行栅格化,并将结果保存在 GPU中。

当 tile 被栅格化之后,compositor thread 收集 tile 信息,draw quads 和 compositor frame(draw quads 集合)。然后合成帧被提交给浏览器进程。然后被发送给GPU。合成的好处就是不需要主线程参与,就可以生成合成帧,保证动画流畅。

Part 4 处理用户事件输入

当用户touch事件发生时,Browser process 首先接收到,然后发送事件类型和坐标给 Renderer process 中合成线程,然后通知 main thread,其查找事件目标元素和运行事件监听器。

合成线程会将页面中带有事件监听器的区域标记为 Non-Fast Scrollable Region,如果事件在这个区域发生,合成线程会发送给 main thread。如果这个区域没有时间发生,则不需要等待 main thread。所以,大量的事件代理,也会影响性能,因为这样会导致标记区域变大。为了防止这种事情发生,通过设置 passive:true(表示永远不会调用 preventDefault),可以告诉浏览器虽然需要主线程监听,但是合成线程可以继续生成合成帧,不必等待,可以使得滚动更加顺滑。

main thread 通过 x,y 坐标和查找 paint records 来确定事件目标

屏幕一般刷新率为60hz,而move事件一般为 60-120hz,所以 Chrome会合并持续事件(wheel,mousewheel,mousemove,touchmove)到下一个requestAnimationFrame 之前触发,避免无效的事件触发。但是,如果你需要精确的用户事件坐标,如果绘图软件等,那么就需要使用 getCoalescedEvents。

1
2
3
4
5
6
7
8
window.addEventListener('pointermove', event => {
const events = event.getCoalescedEvents();
for (let event of events) {
const x = event.pageX;
const y = event.pageY;
// draw a line using x and y coordinates.
}
});

计算最小生成树MST的两种算法

发表于 2021-04-11 |

MST(minimum-spanning-tree)算法,用于计算在加权无向连通图中,生成最小权重的树。

MIT

使用邻接矩阵表示上图:

1
2
3
4
5
6
7
8
var graph = [
[0, 2, 4, 0, 0, 0],
[2, 0, 2, 4, 2, 0],
[4, 2, 0, 0, 3, 0],
[0, 4, 0, 0, 3, 2],
[0, 2, 3, 3, 0, 2],
[0, 0, 0, 2, 2, 0],
];

主要有两种算法:

  • Prim(普里姆) 算法
  • Kruskal(克鲁斯卡尔) 算法

Prim(普里姆)算法:每次从未遍历的节点中选择最小权重点连线

1
2
3
4
5
6
7
8
9
10
11
12
13
14
15
16
17
18
19
20
21
22
23
24
25
26
27
28
29
30
31
32
33
34
35
36
37
38
39
40
41
42
43
44
45
46
47
48
49
50
51
52
function prim() {
var parent = [],
key = [],
visited = [],
length = graph.length,
i;

// 把所有顶点 key 设置为无限大,未访问
for (i = 0; i < length; i++) {
key[i] = Number.MAX_SAFE_INTEGER;
visited[i] = false;
}

// 选择第一个 key 作为第一个顶点
key[0] = 0;
// 第一个顶点为 MST 根结点,所以 parent 为 -1
parent[0] = -1;

// 对所有顶点求 MST
for (i = 0; i < length - 1; i++) {
// 从未处理集合中选出最小的key
var u = minKey(key, visited);
// 设置未true,避免重复计算
visited[u] = true;

// 遍历所有点,如果得出更小的权重,则在 parent 中 保存路径
// 并且更新顶点权重值 key
for (var v = 0; v < length; v++) {
if (graph[u][v] &&
visited[v] === false &&
graph[u][v] < key[v]) {
parent[v] = u;
key[v] = graph[u][v];
}
}
}
return parent;
}

function minKey(key, visited) {
var min = Number.MAX_SAFE_INTEGER,
minIndex = -1;

for (var v = 0; v < key.length; v++) {
if (visited[v] == false && key[v] <= min) {
min = key[v];
minIndex = v;
}
}

return minIndex;
}

Kruskal(克鲁斯卡尔) 算法: 每次从未遍历的边中选择最小权重的边

1
2
3
4
5
6
7
8
9
10
11
12
13
14
15
16
17
18
19
20
21
22
23
24
25
26
27
28
29
30
31
32
33
34
35
36
37
38
39
40
41
42
43
44
45
46
47
48
49
50
51
52
53
54
55
56
57
58
59
60
61
62
63
64
65
66
67
68
69
70
71
72
function kruskal() {
const INF = Number.MAX_SAFE_INTEGER;
var length = graph.length;
var parent = [];
var ne = 0,
a,
b,
u,
v,
i,
j,
min;

// 拷贝 graph 到 cost 中,方便修改和保留原始值
var cost = initializeCost(graph);

// 当 MST 的边数小于顶点总数 - 1 时
while (ne < length - 1) {
// 选出权重最小边
for (i = 0, min = INF; i < length; i++) {
for (j = 0; j < length; j++) {
if (cost[i][j] < min) {
min = cost[i][j];
u = i;
v = j;
}
}
}

// 分别找出 u,v 的祖先节点,看是否为同一节点,如果是,则跳过
// 避免环路
if (union(find(u, parent), find(v, parent), parent)) {
console.log("edge", u, v, graph[u][v]);
ne++;
}

// 避免重复计算
cost[u][v] = cost[v][u] = INF;
}
}

var find = function (i, parent) {
while (parent[i] !== undefined) {
i = parent[i];
}
return i;
};

var union = function (i, j, parent) {
if (i != j) {
parent[j] = i;
return true;
}

return false;
};

var initializeCost = function(graph) {
const cost = [];
const { length } = graph;
for (let i = 0; i < length; i++) {
cost[i] = [];
for (let j = 0; j < length; j++) {
if (graph[i][j] === 0) {
cost[i][j] = INF;
} else {
cost[i][j] = graph[i][j];
}
}
}
return cost;
};

Core Web Vitals

发表于 2021-03-14 |

Google总结了健康网络的三个指标,旨在提高用户体验:

  • Largest Contentful Paint (LCP): 最大内容绘制
  • First Input Delay (FID): 首次输入延迟
  • Cumulative Layout Shift (CLS): 累积布局转移
    指标其实分别对应网站健康度的三个方面:加载、交互性、页面稳定性。
    本文对这篇文章做总结,包含三个部分:指标定义,如何度量,如何优化。

LCP

是衡量页面加载性能的核心指标,表示视口中最大的文字或者图片块渲染的时间。

largest contentful elements 有以下几类:

  • img 标签
  • SVG 中的 image
  • 设置封面的 video
  • 通过 background:url()加载背景的元素
  • 包含了文本节点的块级元素

需要注意的是,增加元素,删除元素会可能会改变 largest contentful element。
并且,加载没有完成的图片,字体没有加载完成的文字,也不能被认为是 contentful element,只有当加载完成后才是。
如果用户与页面有交互事件的发生(点击,滑动),浏览器就不会发布新的largest- contentful-paint 事件

测量

使用 PerformanceObserver API测量

new PerformanceObserver((entryList) => {})
.observe({type: ‘largest-contentful-paint’});
一般来说最后一个entry的startTime就是 largest-contentful-paint 时间,但也有例外的情况,主要是和background tab 相关。

Google已经提供了测量工具:https://github.com/GoogleChrome/web-vitals

也存在最大的元素并不是最重要的情况,这时候就需要自定义Timing工具 https://wicg.github.io/element-timing/

优化

导致LCP很糟糕的原因主要有以下几种:

  • 服务器响应慢(没错,甩锅给后端是每个前端必备的能力)
  • JS 或者 CSS 阻塞
  • 资源加载慢
  • 客户端渲染慢

对与服务器响应慢的情况,首先使用 window.performance.timing 来测量 TTFB,看是否因为服务器的问题。然后就是服务器优化的问题了,不展开。CDN,Cache等。

新增知识点get: 通过 <link rel="preconnect" href="https://example.com" /> 可以提前与服务器建立连接。或者 dns-prefetch 提前获得IP地址(不过这个因为缓存的原因,只有第一次请求的时候会有提高)

对于CSS阻塞渲染的情况,除了常见的减小体积,内联重要的css,还有一个是异步,用一个link标签就可以搞定:
<link rel="stylesheet" href="/path/to/my.css" media="print" onload="this.media='all'; this.onload=null;">

在页面初始化的时候,仅加载需要用到的CSS样式,再异步请求剩余的CSS内容是比较好的处理方法,而且有已经有webpack插件来处理 https://github.com/GoogleChromeLabs/critters

FID

用户第一次与页面交互到执行监听事件所需的时间。

当主线程繁忙(解析或者执行JS文件的时候),浏览器不会立即响应用户操作。

测量:

因为FID的测量需要用户点击,所以在实验环境中使用Total Blocking Time(TBT)

优化:

  • 超过50ms的任务被认为是长任务。分割长任务为多个小的,异步执行任务是有效的方式。
  • 使用 webworker

CLS

元素改变位置的得分总和

分数是影响分数和距离分数的乘积

layout shift score = impact fraction * distance fraction
impact fraction 代表前后两帧中,不稳定元素占视口的比例

distance fraction 代表所有不稳定元素中移动距离占视口的最大比例

优化:

  • 图片和视频需要加上尺寸属性
  • 除非用户交互,否则不要在已有的元素上插入新的元素
  • 使用 transform 动画

参考文档:

https://web.dev/learn-web-vitals/
https://web.dev/optimize-lcp/
https://wicg.github.io/element-timing/
https://github.com/filamentgroup/loadCSS/blob/master/README.md

从测试看react源码_schedulerBrowser

发表于 2021-02-01 |

主要测试 Scheduler 在浏览器中的运行。主要利用 MessageChannel API 进行异步执行 Task

environment

模拟浏览器 MessageChannel API,Mock了 port1 用于异步 onmessage,port2 用于 postmessage
在 port1的 onmessage 赋值了 performWorkUntilDeadline,此函数执行work直至当前 时间切片结束,默认时间切片时间为5ms,时间切片结束,将会把控制权交还给主线程,用于响应用户事件等。

1. task that finishes before deadline
1
2
3
4
5
6
7
8
it('task that finishes before deadline', () => {
scheduleCallback(NormalPriority, () => {
runtime.log('Task');
});
runtime.assertLog(['Post Message']);
runtime.fireMessageEvent();
runtime.assertLog(['Message Event', 'Task']);
});
2. task with continuation
1
2
3
4
5
6
7
8
9
10
11
12
13
14
15
16
17
18
19
20
21
22
23
24
it('task with continuation', () => {
scheduleCallback(NormalPriority, () => {
runtime.log('Task');
while (!Scheduler.unstable_shouldYield()) {
runtime.advanceTime(1);
}
runtime.log(`Yield at ${performance.now()}ms`);
return () => {
runtime.log('Continuation');
};
});
runtime.assertLog(['Post Message']);

runtime.fireMessageEvent();
runtime.assertLog([
'Message Event',
'Task',
'Yield at 5ms',
'Post Message',
]);

runtime.fireMessageEvent();
runtime.assertLog(['Message Event', 'Continuation']);
});

callback 返回子work,但是会在下一个 message event 事件中执行

3. multiple tasks
1
2
3
4
5
6
7
8
9
10
11
it('multiple tasks', () => {
scheduleCallback(NormalPriority, () => {
runtime.log('A');
});
scheduleCallback(NormalPriority, () => {
runtime.log('B');
});
runtime.assertLog(['Post Message']);
runtime.fireMessageEvent();
runtime.assertLog(['Message Event', 'A', 'B']);
});
4. multiple tasks with a yield in between
1
2
3
4
5
6
7
8
9
10
11
12
13
14
15
16
17
18
19
20
21
it('multiple tasks with a yield in between', () => {
// 时间切片为5ms,当设置时间4999之后时,当前时间切片已经用完,所以yield之后,异步执行下一个task

scheduleCallback(NormalPriority, () => {
runtime.log('A');
runtime.advanceTime(4999);
});
scheduleCallback(NormalPriority, () => {
runtime.log('B');
});
runtime.assertLog(['Post Message']);
runtime.fireMessageEvent();
runtime.assertLog([
'Message Event',
'A',
// Ran out of time. Post a continuation event.
'Post Message',
]);
runtime.fireMessageEvent();
runtime.assertLog(['Message Event', 'B']);
});
5. throws when a task errors then continues in a new event
1
2
3
4
5
6
7
8
9
10
11
12
13
14
15
16
it('throws when a task errors then continues in a new event', () => {
scheduleCallback(NormalPriority, () => {
runtime.log('Oops!');
throw Error('Oops!');
});
scheduleCallback(NormalPriority, () => {
runtime.log('Yay');
});
runtime.assertLog(['Post Message']);

expect(() => runtime.fireMessageEvent()).toThrow('Oops!');
runtime.assertLog(['Message Event', 'Oops!', 'Post Message']);

runtime.fireMessageEvent();
runtime.assertLog(['Message Event', 'Yay']);
});

如果 task 执行报错,后面的任务会在下一个 message event 中继续执行 因为在 workLoop 中在执行任务前会先将 task.callback 设置为null,就是取消任务

代码大全

发表于 2020-08-23 |

软件的首要技术使命:管理复杂度

本质的问题和偶然的问题,导致软件开发变得困难
在软件架构的层次上,可以通过把整个系统分解为多个子系统来降低问题的复杂度

解决复杂度:
把任何人在同一时间需要处理的本质复杂度的量减少到最低
不要让偶然性的复杂度无谓的快速增长

理想的设计特征

  • 最小的复杂度
  • 易于维护
  • 松散耦合
  • 可扩展性
  • 可重用行
  • 高扇入。让大量的类使用某个给定的类。意味着设计出得系统很好的利用了在较低层次上的工具类
  • 低扇出。让一个类较少量或者适中的使用其他的类。不超过7个。
  • 可移植性
  • 精简性
  • 层次性
  • 标准技术

数据结构与算法-基础题

发表于 2020-08-01 |

动态数组

栈

队列

约瑟夫问题

1
2
3
4
5
6
7
8
9
10
11
12
13
14
15
16
17
18
19
20
21
22
23
24
25
26
27
28
29
30
31
32
33
34
35
36
37
// 循环链表
function Node(val) {
this.val = val;
this.next = null;
}

function create_linkList(n) {
const head = new Node(1);
let pre = head;
for(let i = 2; i <= n; i++) {
const node = new Node(i);
pre.next = node;
pre = node;
}
pre.next = head;
return head;
}

function main() {
const all = 3;
const num = 1;

const list = create_linkList(all);
let pre = null;
let cur = list;

while(cur.next !== cur) {
for(let i = 0; i < num; i++) {
pre = cur;
cur = cur.next;
}
pre.next = cur.next;
}

console.log(cur.val);
}
main();

链表反转

1
2
3
4
5
6
7
8
9
10
11
12
13
14
15
16
17
function reverseList(head) {
// head 为哨兵节点,不需要反转
let currentNode = head.next;
let previousNode = null

while(currentNode) {
let nextNode = currentNode.next;

currentNode.next = previousNode;

previousNode = currentNode;

currentNode = nextNode;
}

head.next = previousNode;
}

检测链表中的环

1
2
3
4
5
6
7
8
9
10
11
function checkCircle(head) {
let fast = head.next;
let slow = head;

while(fast && fast.next) {
fast = fast.next.next;
slow = slow.next;
if(slow === fast) return true;
}
return false;
}

链表中间节点

1
2
3
4
5
6
7
8
9
10
function findMiddleNode() {
let fast = this.head;
let slow = this.head;

while(fast.next && fast.next.next) {
fast = fast.next.next;
slow = slow.next;
}
return slow;
}

斐波那契数列

求阶乘

二叉树的遍历

二叉树的高度

归并排序

快速排序

八皇后

背包问题

DFS 的递归代码

二分查找

二分查找变体

堆

堆排序

堆的三种应用(优先级队列、Top k、中位数)

字符串匹配 BF 算法

webpack代理实现原理

发表于 2020-07-15 |

算法思想-回溯

发表于 2020-07-13 |

笼统地讲,回溯算法很多时候都应用在“搜索”这类问题上。不过这里说的搜索,并不是狭义的指我们前面讲过的图的搜索算法,而是在一组可能的解中,搜索满足期望的解。回溯的处理思想,有点类似枚举搜索。我们枚举所有的解,找到满足期望的解。

八皇后问题

在8*8的棋盘上放置8个棋子,并且保证行列,左右对角线上都没有棋子。

1
2
3
4
5
6
7
8
9
10
11
12
13
14
15
16
17
18
19
20
21
22
23
24
25
26
27
28
29
30
31
32
33
34
35
36
37
38
39
40
41
42
43
44
45
46
47
48
const result = [];
function cal8queens(row) {
if (row === 8) {
printQueens(result);
}

// 遍历列,如果符合要求则进入下一行,DFS
for (let column = 0; column < 8; column++) {
if (isOk(row, column)) {
result[row] = column;
cal8queens(row + 1);
}
}
}

function isOk(row, column) {
let leftup = column - 1;
let rightup = column + 1;

for(let i = row - 1; i >= 0; i--) {
if (result[i] === column) return false; // 同一列有值,失败

if (leftup >= 0) { // 左对角线有值,失败
if (result[i] == leftup) return false;
}

if (rightup < 8) { // 右对角线有值,失败
if (result[i] == rightup) return false;
}

leftup--;
rightup++;
}
return true;
}

function printQueens(result) {
for (let row = 0; row < 8; row++) {
let s = "";
for (let column = 0; column < 8; column++) {
if (result[row] === column) s += "Q ";
else s += "* ";
}
console.log(s + "\n");
}
console.log("-----------\n");
}
cal8queens(0);

0-1背包

我们有一个背包,背包总的承载重量是 Wkg。现在我们有 n 个物品,每个物品的重量不等,并且不可分割。我们现在期望选择几件物品,装载到背包中。在不超过背包所能装载重量的前提下,如何让背包中物品的总重量最大?

1
2
3
4
5
6
7
8
9
10
11
12
13
14
15
16
17
18
19
20
21
let maxW = 0; // 存储背包中物品总质量的最大值
// i表示考察到哪个物品了;
// cw 表示当前已经装进去的物品的重量和;
// items 物品重量
// n 物品数量;
// w 背包重量
function f(i, cw, items, n, w) {
if (cw == w || i == n) { // 装满了或者考察完所有物品
if (cw > maxW) maxW = cw;
return;
}

// 对于第i个物品,会有装或者不装两种情况
// 不装第i个物品
f(i+1, cw, items, n, w);

// 装第i个物品
if (cw + items[i] <= w) {
f(i + 1, cw + items[i], items, n, w);
}
}

正则表达式

假设正则表达式中只包含“”和“?”这两种通配符,并且对这两个通配符的语义稍微做些改变,其中,“”匹配任意多个(大于等于 0 个)任意字符,“?”匹配零个或者一个任意字符。基于以上背景假设,我们看下,如何用回溯算法,判断一个给定的文本,能否跟给定的正则表达式匹配?

1
2
3
4
5
6
7
8
9
10
11
12
13
14
15
16
17
18
19
20
21
22
23
24
25
26
27
28
29
30
// ti 第i个text字符
// pj 第i个正则字符
// text 文本
// tlen 文本长度

let matched = false;
const pattern = ""; // 正则
const plen = pattern.length;
function match(ti, pj, text, tlen) {
if(matched) return;

if (pj == plen) {
if (ti === tlen) matched = true;
return;
}

if (pattern[pj] === "*") {
for (let k = 0; k <= tlen - ti; k ++) {
match(ti + k, pj + 1, text, tlen);
}
} else if (pattern[pj] === "?") {
// 匹配0个字符
match(ti, pj+1, text, tlen);

// 匹配1个字符
match(ti + 1, pj + 1, text, tlen);
} else if (ti < tlen && pattern[pj] == text[ti]) {
match(ti + 1, pj + 1, text, tlen);
}
}

总结

回溯算法的思想非常简单,大部分情况下,都是用来解决广义的搜索问题,也就是,从一组可能的解中,选择出一个满足要求的解。回溯算法非常适合用递归来实现,

从测试看react源码_scheduler

发表于 2020-06-13 |

这是从测试看react源码的第一篇,先从一个独立的 Scheduler 模块入手。正如官方所说,Scheduler模块是一个用于协作调度任务的包,防止浏览器主线程长时间忙于运行一些事情,关键任务的执行被推迟。用于 react 内部,现在将它独立出来,将来会成为公开API

环境配置

  • 下载源码到本地,我使用的分支是 master(4c7036e80)
  • 由于 react 测试代码太多,如果想要仅测试 scheduler 部分代码,需要修改一下jest配置
  • 打开 package.json,可以看到 test 命令的配置文件是 config.source.js

    1
    "test": "cross-env NODE_ENV=development jest --config ./scripts/jest/config.source.js"
  • 在其中我们可以看到又引入了 config.base.js 文件,接下来就是修改 config.base.js

    1
    2
    3
    4
    5
    6
    - testRegex: '/__tests__/[^/]*(\\.js|\\.coffee|[^d]\\.ts)$',
    + testRegex: '/__tests__/Scheduler-test.js',
    moduleFileExtensions: ['js', 'json', 'node', 'coffee', 'ts'],
    rootDir: process.cwd(),
    - roots: ['<rootDir>/packages', '<rootDir>/scripts'],
    + roots: ['<rootDir>/packages/scheduler'],
  • 在项目根目录下运行 yarn run test,不出意外会看到测试成功运行

jest 相关介绍

在开始之前,先了解一下jest的运行环境,省的一会找不到代码对应位置

  • jest.mock()用于mock某个模块,比如jest.mock('scheduler', () => require('scheduler/unstable_mock'));, 那么之后 require('scheduler') 其实就是引入的 scheduler/unstable_mock.js
  • 如果你看到以 hostConfig 结尾的文件名中内容是 throw new Error('This module must be shimmed by a specific build.');,那么就去 scripts/jest/setupHostConfig.js中去查看到底使用了哪个文件。
  • expect(xx).Function() 这里的 Function 被称为 matcher。 在 jest 中有些默认的 matcher,比如说 toEqual,也可以自定义。scripts/jest/matchers 就是一些 react 自定义的。

miniHeap

scheduler 用于调度任务,防止浏览器主线程长时间忙于运行一些事情,关键任务的执行却被推迟。那么任务就要有一个优先级,每次优先执行优先级最高的任务。在 schuduler 中有两个任务队列,taskQueue 和 timerQueue 队列,是最小堆实现的优先队列。数组第一项永远为优先级最高的子项。

Scheduler-test.js

1. flushes work incrementally
1
2
3
4
5
6
7
8
9
10
it('flushes work incrementally', () => {
scheduleCallback(NormalPriority, () => Scheduler.unstable_yieldValue('A'));
scheduleCallback(NormalPriority, () => Scheduler.unstable_yieldValue('B'));
scheduleCallback(NormalPriority, () => Scheduler.unstable_yieldValue('C'));
scheduleCallback(NormalPriority, () => Scheduler.unstable_yieldValue('D'));

expect(Scheduler).toFlushAndYieldThrough(['A', 'B']);
expect(Scheduler).toFlushAndYieldThrough(['C']);
expect(Scheduler).toFlushAndYield(['D']);
});

Scheduler.unstable_yieldValue 函数比较简单,就是将参数push到一个数组中,用于结果的比较。
scheduleCallback 中会构造 Task, 如下

1
2
3
4
5
6
7
8
9
// 构造Task
var newTask = {
id: taskIdCounter++,
callback,
priorityLevel,
startTime,
expirationTime,
sortIndex: -1,
};

并将其加入 taskQueue 或者 timerQueue。如果当前没有任务在执行则调用 requestHostCallback(flushWork); 用于执行任务。
在测试环境中 requestHostCallback 的实现如下:

1
2
3
export function requestHostCallback(callback: boolean => void) {
scheduledCallback = callback;
}

仅仅是保存了 flushWork 函数, 并没有执行。
传入的 flushWork 函数返回 boolean 变量,当 true 时为有 task 可以执行,但是当前时间切片已结束,将空出主线程给浏览器。其中执行 workLoop,workLoop 是任务执行的真正地方。其首先会从当前 timerQueue 中取出定时已经到期的timer,将其加入到 taskQueue 中。接来下就是取出 taskQueue 中的任务并执行。workLoop 代码如下:

1
2
3
4
5
6
7
8
9
10
11
12
13
14
15
16
17
18
19
20
21
22
23
24
25
26
27
28
29
30
31
32
33
34
35
36
37
38
39
40
41
42
43
44
// 取出已经到时的 timer,放入 taskQueue 中。
advanceTimers(currentTime);

currentTask = peek(taskQueue);
while (
currentTask !== null &&
!(enableSchedulerDebugging && isSchedulerPaused)
) {
if (
currentTask.expirationTime > currentTime &&
(!hasTimeRemaining || shouldYieldToHost())
) {
// This currentTask hasn't expired, and we've reached the deadline.
break;
}
const callback = currentTask.callback;
if (callback !== null) {
currentTask.callback = null;
currentPriorityLevel = currentTask.priorityLevel;
const didUserCallbackTimeout = currentTask.expirationTime <= currentTime;
markTaskRun(currentTask, currentTime);
const continuationCallback = callback(didUserCallbackTimeout);
currentTime = getCurrentTime();

if (typeof continuationCallback === 'function') {
// 当前任务执行过程中被中断,则将之后需要继续执行的callback保存下来
currentTask.callback = continuationCallback;
markTaskYield(currentTask, currentTime);
} else {
if (enableProfiling) {
markTaskCompleted(currentTask, currentTime);
currentTask.isQueued = false;
}
if (currentTask === peek(taskQueue)) {
pop(taskQueue);
}
}
advanceTimers(currentTime);
} else {
// 已经取消的任务,调用unstable_cancelCallback方法取消任务
pop(taskQueue);
}
currentTask = peek(taskQueue);
}

循环取出 taskQueue 中的任务,直到 taskQueue 为空,或者当前时间切片时间已到并且任务也还没有过期,中断循环。把任务放到下一个时间切片执行。注意一下 shouldYieldToHost(),这个也是判断是否继续执行的条件,之后会用到。

1-4 行代码结果就是将四个 task 推入taskQueue,等待执行。然后去看一下 matcher toFlushAndYieldThrough, 位置在 scripts/jest/matchers/schedulerTestMatchers.js。

1
2
3
4
5
6
7
8
function toFlushAndYieldThrough(Scheduler, expectedYields) {
assertYieldsWereCleared(Scheduler);
Scheduler.unstable_flushNumberOfYields(expectedYields.length);
const actualYields = Scheduler.unstable_clearYields();
return captureAssertion(() => {
expect(actualYields).toEqual(expectedYields);
});
}

执行与 expectedYields(就是test里的[‘A’, ‘B’],[‘C’],[‘D’] ) 数量相同的任务,看结果是否相等
unstable_flushNumberOfYields 代码如下,这里的cb就是 flushWork,第一个参数为 true表示当前切片有剩余时间

1
2
3
4
5
6
7
8
9
10
11
12
13
14
15
16
17
18
19
20
21
22
23
24
export function unstable_flushNumberOfYields(count: number): void {
if (isFlushing) {
throw new Error('Already flushing work.');
}
if (scheduledCallback !== null) {
const cb = scheduledCallback;
expectedNumberOfYields = count;
isFlushing = true;
try {
let hasMoreWork = true;
do {
// 执行任务
hasMoreWork = cb(true, currentTime);
} while (hasMoreWork && !didStop);
if (!hasMoreWork) {
scheduledCallback = null;
}
} finally {
expectedNumberOfYields = -1;
didStop = false;
isFlushing = false;
}
}
}

那么何时停止呢?记得之前的 shouldYieldToHost 函数吗,在 schedulerHostConfig.mock.js 在实现了此函数,并且添加了一个 didStop 变量用于测试中控制数量,当达到 expectedNumberOfYields 数量时退出循环。代码如下:

1
2
3
4
5
6
7
8
9
10
11
12
13
export function shouldYieldToHost(): boolean {
if (
(expectedNumberOfYields !== -1 &&
yieldedValues !== null &&
yieldedValues.length >= expectedNumberOfYields) ||
(shouldYieldForPaint && needsPaint)
) {
// We yielded at least as many values as expected. Stop flushing.
didStop = true;
return true;
}
return false;
}

2. cancels work
1
2
3
4
5
6
7
8
9
10
11
12
13
14
15
16
it('cancels work', () => {
scheduleCallback(NormalPriority, () => Scheduler.unstable_yieldValue('A'));
const callbackHandleB = scheduleCallback(NormalPriority, () =>
Scheduler.unstable_yieldValue('B'),
);
scheduleCallback(NormalPriority, () => Scheduler.unstable_yieldValue('C'));

// 取消任务即把task.callback设置为null,
cancelCallback(callbackHandleB);

expect(Scheduler).toFlushAndYield([
'A',
// B should have been cancelled
'C',
]);
});

将task callback 设置为 null 就是取消任务,这部分在 workLoop里有判断

3. executes the highest priority callbacks first
1
2
3
4
5
6
7
8
9
10
11
12
13
14
15
16
17
18
19
it('executes the highest priority callbacks first', () => {
// 这加入taskQueue时,用最小堆排序算法排序的

scheduleCallback(NormalPriority, () => Scheduler.unstable_yieldValue('A'));
scheduleCallback(NormalPriority, () => Scheduler.unstable_yieldValue('B'));

// Yield before B is flushed
expect(Scheduler).toFlushAndYieldThrough(['A']);

scheduleCallback(UserBlockingPriority, () =>
Scheduler.unstable_yieldValue('C'),
);
scheduleCallback(UserBlockingPriority, () =>
Scheduler.unstable_yieldValue('D'),
);

// C and D should come first, because they are higher priority
expect(Scheduler).toFlushAndYield(['C', 'D', 'B']);
});

在 scheduler 中定义了6中优先级:

1
2
3
4
5
6
export const NoPriority = 0;
export const ImmediatePriority = 1;
export const UserBlockingPriority = 2;
export const NormalPriority = 3;
export const LowPriority = 4;
export const IdlePriority = 5;

每种优先级又对应了不同的超时时间:

1
2
3
4
5
6
7
8
// Times out immediately
var IMMEDIATE_PRIORITY_TIMEOUT = -1;
// Eventually times out
var USER_BLOCKING_PRIORITY_TIMEOUT = 250;
var NORMAL_PRIORITY_TIMEOUT = 5000;
var LOW_PRIORITY_TIMEOUT = 10000;
// Never times out
var IDLE_PRIORITY_TIMEOUT = maxSigned31BitInt;

其中 NoPriority 和 NormalPriority 的超时时间一样,这可以在 scheduler.js中看到:

1
2
3
4
5
6
7
8
9
10
11
12
13
14
15
function timeoutForPriorityLevel(priorityLevel) {
switch (priorityLevel) {
case ImmediatePriority:
return IMMEDIATE_PRIORITY_TIMEOUT;
case UserBlockingPriority:
return USER_BLOCKING_PRIORITY_TIMEOUT;
case IdlePriority:
return IDLE_PRIORITY_TIMEOUT;
case LowPriority:
return LOW_PRIORITY_TIMEOUT;
case NormalPriority:
default:
return NORMAL_PRIORITY_TIMEOUT;
}
}

在新建任务时会根据当前时间和超时时间计算出过期时间,taskQueue 是按照过期时间排序的。优先级高的任务,过期时间就会越小,所以会先被执行。

4. expires work
1
2
3
4
5
6
7
8
9
10
11
12
13
14
15
16
17
18
19
20
21
22
23
24
25
26
27
28
29
30
31
32
33
34
35
36
37
38
39
40
41
42
43
44
45
46
47
48
it('expires work', () => {
scheduleCallback(NormalPriority, didTimeout => {
Scheduler.unstable_advanceTime(100);
Scheduler.unstable_yieldValue(`A (did timeout: ${didTimeout})`);
});
scheduleCallback(UserBlockingPriority, didTimeout => {
Scheduler.unstable_advanceTime(100);
Scheduler.unstable_yieldValue(`B (did timeout: ${didTimeout})`);
});
scheduleCallback(UserBlockingPriority, didTimeout => {
Scheduler.unstable_advanceTime(100);
Scheduler.unstable_yieldValue(`C (did timeout: ${didTimeout})`);
});

// Advance time, but not by enough to expire any work
Scheduler.unstable_advanceTime(249);
expect(Scheduler).toHaveYielded([]);

// Schedule a few more callbacks
scheduleCallback(NormalPriority, didTimeout => {
Scheduler.unstable_advanceTime(100);
Scheduler.unstable_yieldValue(`D (did timeout: ${didTimeout})`);
});
scheduleCallback(NormalPriority, didTimeout => {
Scheduler.unstable_advanceTime(100);
Scheduler.unstable_yieldValue(`E (did timeout: ${didTimeout})`);
});

// Advance by just a bit more to expire the user blocking callbacks

// currentTime被设置成249 + 1 而 UserBlockingPriority 的timeout为250,所以超时执行
Scheduler.unstable_advanceTime(1);
expect(Scheduler).toFlushExpired([
'B (did timeout: true)',
'C (did timeout: true)',
]);

// Expire A
// 250 + 100 + 100 + 4600 = 5050 > 5000(NORMAL_PRIORITY_TIMEOUT)
Scheduler.unstable_advanceTime(4600);
expect(Scheduler).toFlushExpired(['A (did timeout: true)']);

// Flush the rest without expiring
expect(Scheduler).toFlushAndYield([
'D (did timeout: false)',
'E (did timeout: true)',
]);
});

UserBlockingPriority 类型的任务,新建 task 时设置过期时间为当前时间 + USER_BLOCKING_PRIORITY_TIMEOUT(250), 而 NormalPriority 则为 当前时间 + NORMAL_PRIORITY_TIMEOUT(5000)。
unstable_advanceTime 作用是就是增量当前时间。比如 unstable_advanceTime(100),意味这当前时间增加了 100ms,如果当前时间大于过期时间,则任务过期。
在最后调用 scheduledCallback 时, 代码如下:

1
2
3
4
5
6
7
8
9
10
11
12
13
14
15
16
export function unstable_flushExpired() {
if (isFlushing) {
throw new Error('Already flushing work.');
}
if (scheduledCallback !== null) {
isFlushing = true;
try {
const hasMoreWork = scheduledCallback(false, currentTime);
if (!hasMoreWork) {
scheduledCallback = null;
}
} finally {
isFlushing = false;
}
}
}

在其中调用 scheduledCallback(也就是 flushWork) 时将 hasTimeRemaining 参数设置为false,当前时间切片未有剩余,仅任务过期才会执行,未过期则放到下一个时间切片执行。这里的第一个测试 Scheduler.unstable_advanceTime(249),有些多余,不管设置成多少都不会有变化。
这里需要注意的是D, E 任务过期时间为 5249,所以最后 D 任务没有过期 而 E 任务过期了。

5. continues working on same task after yielding
1
2
3
4
5
6
7
8
9
10
11
12
13
14
15
16
17
18
19
20
21
22
23
24
25
26
27
28
29
30
31
32
33
34
35
36
37
38
39
40
41
42
43
44
45
46
47
48
it('continues working on same task after yielding', () => {
// workLoop 中如果callback执行之后返回函数,会把返回的函数再次存入task对象的callback中保存下来
scheduleCallback(NormalPriority, () => {
Scheduler.unstable_advanceTime(100);
Scheduler.unstable_yieldValue('A');
});
scheduleCallback(NormalPriority, () => {
Scheduler.unstable_advanceTime(100);
Scheduler.unstable_yieldValue('B');
});

let didYield = false;
const tasks = [
['C1', 100],
['C2', 100],
['C3', 100],
];
const C = () => {
while (tasks.length > 0) {
const [label, ms] = tasks.shift();
Scheduler.unstable_advanceTime(ms);
Scheduler.unstable_yieldValue(label);
if (shouldYield()) {
didYield = true;
return C;
}
}
};

scheduleCallback(NormalPriority, C);

scheduleCallback(NormalPriority, () => {
Scheduler.unstable_advanceTime(100);
Scheduler.unstable_yieldValue('D');
});
scheduleCallback(NormalPriority, () => {
Scheduler.unstable_advanceTime(100);
Scheduler.unstable_yieldValue('E');
});

// Flush, then yield while in the middle of C.
expect(didYield).toBe(false);
expect(Scheduler).toFlushAndYieldThrough(['A', 'B', 'C1']);
expect(didYield).toBe(true);

// When we resume, we should continue working on C.
expect(Scheduler).toFlushAndYield(['C2', 'C3', 'D', 'E']);
});

这里主要看下任务C,其 callback 其最后又返回了自身,相当于任务的子任务,被中断之后,下一个时间切片继续执行子任务。子任务继承了父任务的所有参数,当执行完当前子任务之后,仅仅需要设置父任务 callback 函数为下一个子任务 callback,在 workLoop 中的相关代码如下:

1
2
3
4
5
6
7
8
9
10
11
12
13
14
15
16
const continuationCallback = callback(didUserCallbackTimeout);
currentTime = getCurrentTime();

if (typeof continuationCallback === 'function') {
// 当前任务执行过程中被中断,则将之后需要继续执行的callback保存下来
currentTask.callback = continuationCallback;
markTaskYield(currentTask, currentTime);
} else {
if (enableProfiling) {
markTaskCompleted(currentTask, currentTime);
currentTask.isQueued = false;
}
if (currentTask === peek(taskQueue)) {
pop(taskQueue);
}
}

总结

目前讲解了5个测试,而关于 scheduler 中的测试还有很多,更多的细节还需要自己去分析,希望本文可以起到抛砖引玉的作用,给你起了个阅读源码的头,勿急勿躁。下次会分享 schedulerBrowser-test,模拟浏览器环境对 scheduler 进行测试。

123
山石岩

山石岩

大前端

21 日志
6 标签
© 2021 山石岩
由 Hexo 强力驱动
主题 - NexT.Muse